Friday, September 28, 2012

Kumbakonam Kaddapa

Kadappa is very famous kumbakonam side dish for idli/dosai. Its a cross between sambar and kurma and a combination that I normally wouldn't think of putting together.

I was really bored of the usual idli-dosai side dishes and wanted to cook up something entirely different. I googled immediately and this kadappa recipe came up. I quickly searched the ingredients list and saw moong dal, potato and a coconut paste. This combination sounded quite weird. And then i thought- I like moong dal, potato - yum, and coconut paste - mm-mm, so whats not to like right? ;). So decided to give this recipe a shot and I was pleasantly surprised at its different yet yum taste. Sometimes certain combinations don't strike a good chord immediately but this one did :). I was happy at discovering this authentic kumbakonam recipe! For me, from now on kadappa goes into my usual list of dosai accompaniments :-).

Kumbakonam Kadappa


Ingredients

Modified from here

Serves - 3
Spice Level - Moderately spicy
Prep Time - 20 min
Cook time - 15 min


Moong dal - 1/4 cup
Potato - 1 Large
Green chilli - 1, sliced thinly
Onion - 2 , sliced thinly lengthwise
Tomato  - 1 , chopped or juice of 1/2 lemon
Coriander Leaves - 1 Tbsp , to garnish
Turmeric - a pinch
Salt - as needed

To Temper

Oil - 1 Tbsp
Hing - a pinch
Jeera - 1 Tsp
Bay Leaf - 1
Cinnamon - 1 inch piece
Mustard - 1 Tsp
Curry Leaves - to sprig

To grind to a paste

Coconut - 1/4 cup
Green chilli - 2
Fennel - 1 Tsp
Jeera/Cumin - 1 Tsp
Poppy seeds [ khas khas ] - 1 Tsp
Garlic cloves - 2
water - few tbsp to grind with

How do you do it

1. Firstly pressure cook the moong dal with a pinch of turmeric and mash and keep aside. Also pressure cook the potatoes and mash roughly and keep aside.

2. Grind the items under " To grind to a paste".

3. Heat oil in a kadai. Add hing,bay leaf, cinnamon and mustard , jeera - let them roast. Add curry leaves and onion, green chilli and saute till onions are translucent. Add in the tomato pieces, little salt and saute till they are soft and mushy. They should let the juice out.

4. Add the mashed dal and potatoes and stir well. Simmer flame now, as you don't want the dal and potato mix to get burnt. Add in 2 cups of water, remaining salt and mix well. Let them come to a slow boil.

5. Maintain low flame. Add in the coconut paste now and mix well and bring to a slow boil. Let it boil on low flame for 2 minutes. Adjust consistency of the curry at this stage.

6. Switch off flame and garnish with coriander leaves. Serve hot with crispy dosai.

Notes

You can skip the tomato and add juice of half a lemon, but you need to add lemon juice at the end after switching off the flame.

Print this Post

Continue Reading >>

Tuesday, September 25, 2012

Chettinadu Egg Curry

I have been thinking about making this egg curry for almost a month. The thought planted itself on my mind and wouldn't get out until I made it. This happens often with me , I would plan on making a curry the next day, and some how for what ever reason that wouldn't happen. I will spend the next few days visualizing the dish and start craving for it and it would tease me until I got around to do it. This was one such curry. So one fine Sunday afternoon for lunch, we had egg curry with peas pulao.

This chettinadu egg curry is from the book "Authentic chettinadu" which was given to me as a wedding gift. :). I haven't cooked much from it, usually Amma is my source for all the chettinadu stuff, but she doesn't make egg curry that often at home and I liked the version in the book. Its a spicy dish that should pair up quite well with dosai , idli, plain rice as well as any variety rice.


Chettinadu Egg Curry


Ingredients

Recipe Source - Authentic Chettinadu curries book

Serves - 2
Spice Level - High
Prep Time - 20 min
Cook time - 15 min


Egg - 4 [hard boiled, and peel the skin]
Shallots - 10, chopped well
Tomato - 1 Large - chopped finely
Masala/Curry powder - 1 Tsp
Coriander Leaves - few tbsp chopped finely
Oil - 1 Tbsp
Jeera - 1 Tsp
Curry Leaves - 2 Sprigs
Hing - a pinch
Salt - as per need
Turmeric - a pinch

To grind to a paste

Shredded coconut - 5 Tbsp
Dry Red chilli - 2
Pepper - 1 Tbsp
Garlic cloves (small) - 5
Ginger - 1 inch piece
Cumin -1 Tsp
Fennel - 1 Tsp
Coriander seeds - 2 Tsp
Cashews - 4
Curry Leaves - 2 sprigs
Water - few tbsp to grind with

How do you make it.

1. Dry roast the ingredients under "to grind to a paste" on low flame except cashews and curry leaves until it slightly starts to brown and you get a good aroma. Cool and blend including the curry leaves and cashews with few tbsp of water into a fine paste.

2. Make slits in the boiled egg so the curry can get in. Just make light slits, not too deep, we dont want the egg to break when its added into the curry.

3. Heat oil in a kadai. Add jeera, hing and curry leaves. Let it roast. Add shallots and saute until they are translucent. Add the tomato pieces , little salt and turmeric and cook until they are soft and mushy and let out juice.Add the masala powder and cook for a minute. Now add in the paste and saute for a few seconds. Add 3/4 cup water and remaining salt and let the curry boil. Adjust consistency of the curry according to your needs here - add more water if you need a loose curry or let it boil to thicken if you want a thicker consistency.

4. Once the curry reaches the correct consistency and the paste has cooked well, add the egg pieces and coriander leaves and wrap gently. Switch off flame.

Allow the gravy some resting time before serving.

Print this Post

Continue Reading >>

Thursday, September 20, 2012

How to make Idiyappam - Step by Step recipe

Hello all! I have been on a good holiday the past week. The longest I have ever been away from this blog but it was a really fun and interesting time at my native place. This is the first time I am being a part of this kind of a function where we offer tribute to our forefathers. It is a 3 day function in total, the first day is the temple-visit day , the entire family tree starting from my father-in-law's great grandfather till the present generation gathered at our kuzha dheivam temple , prayed for good health wealth and happiness and got back to our 100 year old typical chettinadu home. All the ladies then got busy with the prep work for the next day feast that is to be made for around 400-500 people. :). I got to see and also give them a hand in grinding the flour the traditional way [stone method] and cooking at such a huge scale. The cooking continued the second day, making pongal , frying paniyarams in the viragu adupu. I could only help with 4-5 rounds of paniyaram with the viragu adupu, my eyes started burning from the flame, ah I wonder how they used this every other day hose days! :O. That evening we had the pooja and relished on the feast for dinner. :)

The next day was slotted for the auction that took place in our home. A lot of people offer many things such as fruits, silver ware, clothes, toys etc  for the pooja. Once the pooja is over, all these things are sold in an auction. The funds collected from this auction is then given to the temple for its maintainence and upkeep and other related kovil activity. It was fun to see a live auction ;). So all in all it was a very unique holiday experience with the full swing traditional activity and having good food 4 times a day minus the scorching heat we had to put up with! And before you ask, I dont have pictures to share with, I kept cursing myself so much that I forgot to take the camera. :( . And yeah I had paneer soda, I love paneer soda and never miss it when i visit my native town.

So with this update I am going to share a recipe , one that is very close to my heart and that is Idiappam with step-wise pictures.


Ingredients

Serves - 2
Prep time - 30 min
Cook time - 15 min


To make the dough for Idiyappam

Idiyappam flour - 2 cups

*** I get idiyappam flour from my native place where we have our chettinadu shops which sell this. These days there are many brands that sell idiyappam flour , you could use one of them. Anil idiyappam flour is one such brand. ***

Water -  2 cups +/- few tbsp
Salt - 1 Tsp

For tempering

Curd - 1 Tbsp
Water - 1 Cup
Salt - 1 Tsp
Curry Leaves - 2 Sprigs
Dry Red Chilli - 3
Mustard - 1 Tbsp
Urad Dal - 1 Tbsp
Hing - a generous pinch
Oil - 3 Tbsp

How do you do it

To make the dough

First bring two cups of water with 1 tsp salt to boil and switch of flame. Take the flour in a bowl and add this boiled water slowly and mix with spatula. Bring the flour together and knead to get a slightly sticky soft dough. I needed 2 cups plus few tbsp of water to make the dough. You can see the dough in the picture below. The idiyappam press is also shown, this press is quite easy and not like the traditional wooden kattai where its difficult to press the dough for making the idiyappam.


Next divide the dough into 4 equal parts and shape one part of the dough like a banana and put it inside the steel tumbler and fit the equipment and keep it ready to press the idiyappam.


I use my Idli chatti method to steam idiyappams. I take a wet cloth and line the idli plate with it and press the idiyappam on top of it and steam.Rotate the handle as shown below and see the idiyappam falling out of the press. Do this until all the dough inside the press is over. You can fill the press again with dough and repeat until your idli plate is full. For 2 cups of flour, I had to steam two plates of idiyappam.


Place this plate on top of idli vessel containing boiling water and close the lid. Steam for 3-5 minutes on high flame. Do not over steam, if you do, the idiyappam will not be soft in texture. When you touch and break the idiyappam , it should not be sticky - this means its cooked enough.


This is the steamed idiyappam.


To temper the idiyappam

Tear into medium length the steamed idiyappam and keep ready. Mix 1 tbsp of curd in 1 cup of water, add salt and mix well. Dip all the steamed idiyappam in this curd -water mix, remove it immediately and place it in a colander. [ Don't skip this step, this will ensure your idiyappam is very soft in texture while tempering]. Heat oil in a kadai. Add hing, mustard, urad dal and let it splutter. Add the broken red chilli and curry leaves. Now add the idiyappam , required salt and stir well on low flame until the tempering is mixed well. Switch off flame.

Serve hot with chettinadu sambar :)


Print this Post

Continue Reading >>

Saturday, September 8, 2012

Chettinadu Mandi

This is a signature Chettinadu side dish and always takes an important place in our Vazhai-elai saapadu [banana-leaf lunch]. I am huge fan of this side dish and so is S. I could get away without making anything else for lunch when we have mandi. Curd rice, mandi and appalam is an awesome combination for a very satisfying lunch.

You would be surprised at what forms the base of this dish. Mandi/Arisi Mandi is the water collected when you wash idli rice. You could collect this water while making idli batter or dosai batter and refrigerate it for later use. This arisi mandi water is what makes the dish very tasty and quite unique. I would highly recommend you to try this dish , its a guaranteed hit. :-)

Mandi


Ingredients

Serves - 2
Spice Level - Moderately Spicy
Prep Time - 20 min
Cook time - 15 min

Arisi Mandi - 3 cups
Shallots/sambar onion - 15 , peeled and chopped lengthwise.
Garlic - 15 , peeled , don't chop it.
Green chilli - 4, slit lengthwise and cut in half
Potato - 1, chopped into medium sized pieces
Radish - 1 , sliced into thin pieces
Beans - 5 , cut into medium sized pieces
Drumstick - 1 , cut into medium sized pieces
Ladies finger - 5, cut into medium sized pieces
Tamarind - size of a small lemon, extract juice from this and keep aside.
Oil - 2 Tbsp
Mustard - 1 Tsp
Fennel - 1 Tsp
Curry Leaves - 2 sprigs

When you make idli batter or dosai batter, before soaking idli rice, wash 3 cups of this rice once very lightly and drain. Add 3 cups water to this rice and soak for 10 minutes. Now what you need to do is dip your hand into the bowl and wash the rice well so you get a foggy water. Try to wash as much as possible to get a thick arisi mandi. Now collect this water and refrigerate and use while making mandi. This water would stay good for about 2 days.

Its not necessary to use all the above veggies, you could use 3-4 from the list. Other vegetables like mochai, avarkai , keerai can be included. No English veggies like carrot/cauliflower/cabbage etc should be used.

How do you do it

Firstly mix bhindi/ladies finger with 1 tsp oil , 1/4 tsp salt and microwave on high for 4-5 minutes. Keep aside. This is to make sure the bhindi gets cooked easily without being slimy later.

Take 1 cup of Arisi Mandi and mix with the tamarind juice and keep aside.

Heat oil in a kadai. Add mustard, let it splutter. Add fennel,curry leaves now. Then add in the onions, garlic. Saute for a couple of minutes. Add green chilli , saute till onions are translucent.Add in the bhindi now and make sure they are cooked well , it should not be gooey. Now add in all the other veggies except for potato and saute for 2 minutes. Add the 2 cups of arisi mandi now. When the mandi starts to boil, add in the potato pieces too. When the potatoes are half cooked, add the tamarind water mixed with mandi , salt and cook on medium-low flame until all veggies are cooked well. Let the curry boil at the end for about 2-3 more minutes before switching off flame. The consistency of the mandi is such that its neither too thick nor too watery. So if its too thick, add water , boil for few more minutes, if its too watery, continue simmering until curry thickens.

Serve with curd rice and appalam. 

Print this Post

Continue Reading >>

Friday, September 7, 2012

Gobi Manchurian

I have been sleeping so much this week and here I am awake at 2.30 am browsing TV channels and there is nothing interesting to watch, also Divya requested this post soon so she could try it over the weekend :). So I thought I might as well compose this post and put it up.

Gobi Manchurian needs no introduction, atleast in India it doesn't ;). I wonder why this dish is so popular here and nobody gets bored of this dish. Have you seen that map picture where they mark the china area as "Gobi Manchurian" ? These days Gobi Manchurian reminds me of that map picture and  I go he-he!.

A favorite restaurant starter order for many, but its quite easy to make it at home as well. If you make Indo-Chinese at home often, you must already be having all the ingredients for the sauce. So make Gobi 65 and the sauce, dunk the Gobi 65 in the sauce and your Manchurian is ready.

Gobi Manchurian


Ingredients

Serves - 2
Spice Level - Moderately spicy
Prep Time - 20 min
Cook time - 20 min


Make Gobi 65 for a medium sized cauliflower.

For the sauce

Spring Onion white part [bulbs] - 5 , sliced thinly
Spring Onion green part - 3-4 Tbsp
Garlic cloves - 5 chopped finely
Capsicum - 1/2 , chopped thinly 1 inch pieces
Green Chilli - 2 , chopped finely
Soya sauce - 1 Tsp
Tomato Ketchup/Sauce - 2 Tbsp
Green Chilli sauce - 1 Tsp
Red Chilli Sauce - 1 Tsp
Corn flour - 1 Tsp mixed with 2 Tbsp water
Salt - as per need
Oil - 3 Tbsp


How do you do it

Make Gobi 65 as done here and keep aside

Heat oil in a kadai. Add the chopped garlic and saute on medium heat for a minute. Add the spring onion white part , chopped green chilli and saute for 3-4 minutes until it starts to sweat. Add the capsicum pieces and saute for a couple of more minutes. Now add the soya sauce,tomato ketchup, green chilli sauce,red chilli sauce, salt and mix well. Let it heat for a minute. Add the corn flour paste now and mix well. Add the gobi 65 and spring onion green part now and wrap well. Saute for a minute more and switch off flame.

Garnish with spring onion greens and serve with any variety rice of your choice or with roti/naan.


Print this Post

Continue Reading >>

Thursday, September 6, 2012

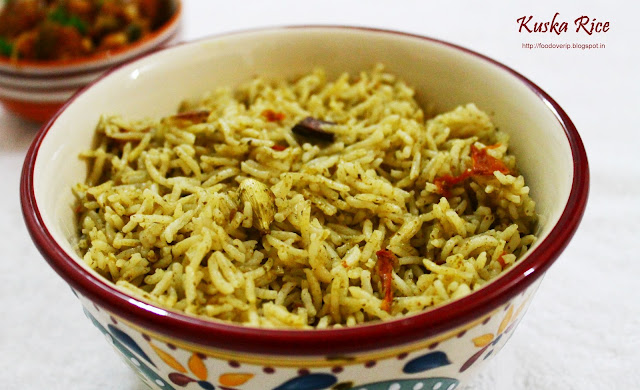
Kuska Rice

Do you run out of vegetables once in a while and wonder what you could do to ruffle up for a quick lunch?  This happens now and then in my kitchen, I would not have any veggies and be in a dilemma on what to cook. So here is something that is easy, quick and very comforting. Kuska Rice is a mildly flavored biryani rice made with just onions, tomatoes, some herbs and coconut milk. This is traditional Muslim Ramadan food, and they add the chicken mix to this kuska rice to make chicken biryani.

Kuska Rice


Ingredients

Recipe modified from here
 
Serves - 2
Spice Level - Mild and Flavorful
Prep Time - 15 min
Cook time - 15 min


Basmati Rice - 1 cup
Water - 1.25 cups
Coconut milk - 1/4 cup
Ghee - 1 Tbsp
Cardamom - 2
Cloves - 2
Bay leaf - 1
Cinnamon - 1 inch stick
Oil - 1 Tbsp
Onion - 1 , chopped finely
Tomato - 1 , chopped finely
Ginger-Garlic paste - 1 Tsp
Salt - as per need

To grind to a paste

Mint Leaves - a handful
Coriander Leaves - a handful
Green chilli -2


How do you do it

1. Firstly soak the biryani rice in water for 10 minutes. Once done, drain and keep aside.

2. Grind the ingredients under "to grind to a paste"  with little water and keep aside.

3. Heat ghee in a kadai, add bay-leaf,cardamom,cloves,cinnamon and saute for 30 sec. Add the rice now and saute until you get a nice aroma, for 2 minutes. Once done transfer to the rice cooker vessel.

4. Heat oil in a kadai. Add the chopped onion , GG paste and saute till onions are translucent. Add tomatoes now and saute until they become mushy and are cooked well. Now add in the ground paste, little salt and saute for few minutes until the raw smell of the paste vanishes. Transfer this to the rice cooker vessel and mix well with rice.

5. Add 1.25 cups of water and 1/4 cup coconut milk to the rice vessel, add required salt and mix well. The correct amount of salt needed while cooking any variety rice is such that you should be able to taste the salt in the water a little more than the proper level. Cook this rice for 12-15 minutes. Flavourful Kuska rice is ready.

We had kuska rice with a gobi manchurian and cucumber raitha.


Print this Post

Continue Reading >>

Tuesday, September 4, 2012

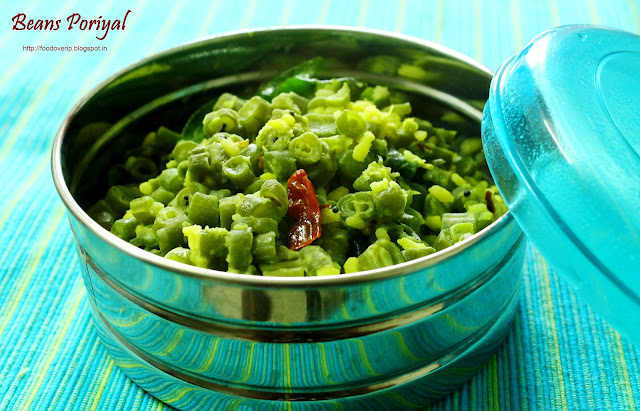
Bean Paruppu Poriyal | Beans-Moong dal stir fry

Combine beans and moong dal for a poriyal dish and its the tastiest poriyal ever. I don't prefer making poriyals with grated coconut, I would like a dal to be used instead and this does get many folks to like the poriyal rather than considering them to be quite boring. Try this poriyal and it would become a favorite, trust me!.

Beans Poriyal


Ingredients

Serves - 2
Spice Level - Moderately Spicy
Prep Time - 20 min
Cook time - 10 min


Moon dal - 1/4 cup , pressure cooked with a pinch of turmeric such that its tender but doesn't get mashed when added later
Beans - 250 gm , chopped into small pieces and steamed until tender
Oil - 1 tbsp
Mustard - 1 Tsp
Urad dal - 1 Tsp
Jeera/Cumin  - 1 Tsp
Dry Red chilli - 1
Curry leaves - 1 sprig

How do you do it

Heat oil in a kadai. Add mustard, urad dal, jeera and let it roast. Break the red chilli and add along with curry leaves. Add the boiled beans, half the amount of salt and saute for a 3-4 minutes. Add the boiled moong dal and mix well. Add remaining salt and saute for a couple of more minutes. Remove from flame.

Serve with rice and some spicy gravy/kuzhambu

Notes

I prefer the moong dal being tender but firm such that it doesn't get mashed when added to the beans. But amma boils the moong dal quite well, so that it gets mashed when added later. You may do it either way.


Print this Post

Continue Reading >>

Sunday, September 2, 2012

Mushroom Pesto Bruschetta

Did I tell you that I am head over heels in love with mushroom?  I have no issues having a mushroom soup as an appetizer, tandoori mushroom for an entree, mushroom tikka masala with naan for main course :).  Any restaurant I visit for the first time, I always choose at least one mushroom dish, that way I am quite adventures with mushroom dishes. S was one among the many people who dint like mushroom, now I wonder if he doesn't mind the vegetable due to my obsession with it or did he acquire the taste naturally. This month my kitchen has been quite mushroom heavy and I have been forbidden to buy any mushroom by S until further asked otherwise!  Ha ha! So during the mushroom month, I wanted to make a mushroom bruschetta and it was a winner :).

Another Aromas cafe inspired dish this is. One of my favorite frequent orders is their cheese mushroom bruschetta, and  bruschettas are quite simple to make if you don't have to make the baguette itself  :). Some french baguette, sauteed mushroom and some pesto and you are ready to put up an awesome starter for a party.

Mushroom Pesto Bruschetta


Ingredients

Serves - 2 [Makes around 10-12 pieces]
Prep Time - 20 min
Cook time - 15 min


1 French baguette
Mushroom - 200 gm cleaned and chopped finely
Shallots - 4-5 , chopped finely
Coriander leaves - 4 Tbsp finely chopped
Salt - as per need
Pepper - to season as per need
Garlic cloves - 4 chopped finely
Shredded Parmesan/mozzarella cheese - 5 Tbsp
Olive oil - 1 tbsp

For the Pesto

Basil Leaves - 1 Handful
Almonds - 5-6
Garlic cloves - 2
Olive oil -  4-5 Tbsp
Salt - as per need

How do you do it

First to make the pesto , chop the almonds and dry roast them until they give out a nice aroma and slightly start to brown.

Bring 1 cup salted water to a boil; add basil, and submerge with a spoon. Let it boil for a minute or two. Immediately drain in a colander. Rinse with cold water until cool, then pat basil completely dry in paper towels

Combine the basil leaves, toasted almonds , garlic cloves , salt and grind in a food processor without any water for first few pulses. Then add olive oil tbsp by tbsp and grind until all of them come together well. The final texture of pesto will be a little coarse. Keep aside.

In a frying pan heat olive oil. Add mushrooms and saute until liquid evaporates (about 3-5 min.). Add shallots and garlic, saute for 1 more minute. Add coriander leaves, salt and pepper to taste. Remove from heat.

Cut the french baguette into diagonal cross section of 1 inch. Brush one side with olive oil. Place slices on a baking sheet and broil in oven until LIGHTLY golden brown (this takes only 2 min). Remove from oven and spread each slice with basil pesto and topped with mushroom mixture. Last sprinkle some cheese on top. Return to a preheated 180 degree C. oven. Bake until cheese is melted and center toppings are hot (about 2-5 minutes).

You can toast the baguette even in a frying pan if you don't have an oven. Brush the baguette on both sides with oil and toast only one side until slightly browned. Don't let it brown a lot. Remove from frying pan, spread with pesto, top with mushroom mixture and some cheese on the browned side, return to pan and close with a lid and heat on low flame until  the cheese melts.


Print this Post

Continue Reading >>
Related Posts Plugin for WordPress, Blogger...

A la carte!

Along with idli/dosai (13) Along with rice (32) Along with rotis (21) asparagus (1) baby potatoes (4) bajji (1) baking (9) banana (1) basil (1) basmati (2) beans (1) beetroot (5) bhindi (3) biryani (1) Black eyed beans (2) blueberry (1) bok choy (1) bottle gourd (1) bread (3) breakfast (4) brinjal (4) brocolli (1) buttermilk (1) butternut-squash (1) cabbage (2) cakes (7) carrot (1) carrots (3) cashews (1) cauliflower (8) cheescake (2) chettinadu (24) chettinadu delicacy (23) Chicken (7) chilli (1) Chineese (3) chinese (1) chocolate (1) chole (2) chutney (6) coconut (5) coconut milk (1) coriander (4) corn (1) cow-peas (1) cream-cheese (2) curry leaves (1) dal (3) dates (1) desserts (14) diwali 2013 (1) dosai (1) drink (1) drumstick (2) dry field bean (1) Easy (44) egg (3) fenugreek (1) fish (1) Food and Travel review (1) garlic (9) ginger (1) gobi (1) green gram (1) How To (5) Indian Flat Breads (4) indian sweets (3) International (5) ivy gourd (2) jeera (3) kootu (1) kovakkai (1) lemon (3) lentils (11) lobia (1) malai (1) mango (2) masoor dal (1) Methi (2) mint (2) mix veg (9) mochai (1) moong dal (4) mushroom (10) mutton (1) non-veg (2) onion (2) orange (1) paneer (11) parathas (1) pasta (2) peas (7) pepper (1) pickles (1) plantain (1) poriyal (1) potato (14) potatoes (2) quinoa (1) Rajma (1) rasam (1) rice flour (1) rosemary (2) shallots (1) snack (18) soup (7) soy chunks (1) spinach (6) stir-fry (1) strawberry (1) sweet potatoes (1) tamarind (5) tomato (7) toor dal (1) val bean (1) Variety Rice (13) walnut (1) wheat (2) yoghurt (1) yuuum!! (1) zucchini (2)

Latest on Food Over IP

Copyrights

All rights reserved @2012.

Unless otherwise mentioned, the text and images included in FoodOverIP blog belongs to the author. The blog author’s permission is required before any content is reproduced in any form.

  © Blogger templates The Professional Template by Ourblogtemplates.com 2008

Back to TOP  

Blogging tips