Saturday, February 25, 2012

Vendakai Pachadi/ Ladies Finger Lentil Curry

I am always reminded of my bachelorette days in bangalore with my two wingies from university- Nivi and Soumi when i make Vendaikai Pachadi . They were quite fond of this preparation of mine, and this post is dedicated to the two of them and to our lovely Indira Nagar days in Bangalore :)

Vendaikai Pachadi


Ingredients

Shallots - 10 chopped
Green chilli - 2-3 , slit length wise and cut in half
Ladies Finger - 1 cup chopped
Toor Dal - 1/4 cup , pressure cooked with a pinch of turmeric, dal must be slightly mashable.
Tamrind extract - 4-5 Tbspn
Curry Leaves - 1 sprig
Jeera - 1 tspn
Mustard - 1 tspn
Hing - a pinch.
Salt - as per taste
Oil - 2tsp + 4tbspn
water - 1 cup

Method

For most of us who cook bhindi, the first thing that probabaly comes to mind is the gooey-ness of it and the time it takes for the bhindi to cook for that gooey thing to disappear. So here is a method that is faster and easier to cook bhindi properly if you have a micowave oven.

In a glass bowl, toss the chopped bhindi,add  2 tspn of oil, 1 tspn salt  mix well, and heat it for 5 mins. Take it out at half-time, stir it and return to microwave for the remaining time. Doing this step, makes the bhindi dry, and when you proceed with the actual curry recipe, the bhindi cooks much faster and you dont see that gooey-ness. Try this,and you will always stick to this method for almost all bhindi featuring dishes.

Take a pan and heat some oil. Add hing, then mustard, let it splutter, add jeera - let it roast. Add the shallots, green chilli, curry leaves,give it a stir for a minute and throw in the microwaved bhindi. Saute it till the bhindi gets cooked well [slightly crispy and zero gooey-ness]. If you have used the microwave method to fry the bhindi, this step will maybe take only 5-7 minutes. Otherwise, if you are adding fresh bhindi , this could go on for 15-20 minutes. Please be patient.After this add in the tamrind extract, 1/2 cup water, salt and let the bhindi boil in the tamrind mix for 2-3 minutes. Now add the cooked dal, stir well. Boil the pachadi in low flame for 4-5 minutes and switch off flame.

We had this along with rice, kara-kuzhambu and carrot-thayir pachadi , the recipes of which will follow soon. :)

Notes

1. If you dont fry the bhindi in the microwave , and add fresh bhindi to the pan, it will take 15-20 minutes for the bhindi to get slightly crisp and for zero - gooey-ness. Add a tbspn of curd, and a tspn of sugar at this step to speeden the process. I used to do this initially before i came to know of the microwave method.

2.While adding tamrind extract tbspn by tbspn, make sure to taste in between, so that it doesnt get too tangy. The way i prepare tamrind extract is more diluted than how it is generally prepared. So adjust the quantity of tamarind extract as per your taste.

Print this Post

Continue Reading >>

Friday, February 24, 2012

Carrot cake with Cream-Cheese Frosting

I have known this recipe for long now, but never got around to do it. The time seemed apt today as I wanted to clear up the carrots in my fridge and some remaining cream cheese. :). So its almost like the carrots and cream cheese wanted to be made into a cake. :)

Carrot Cake with Cream-Cheese frosting


Ingredients

Cake recipe adapted from - Laura in the Kitchen

For the cake 

Shredded Carrot - 1.5 cups
All Purpose Flour - 1  and 3/4 cups
Chopped almonds - 3 Tbspn
Raisins - 2 Tbspn
Sugar - 1/2 cup
Brown sugar - 1/4 cup
Baking soda - 1 tspn
Cinnamon - 2tspn
Salt - 1/2tspn
Vegetable oil - 1 cup
Eggs - 2
Vanilla extract - 1Tbspn
Grated orange zest - 1Tspn

For the Frosting

Cream cheese - 100 gms
Unsalted Butter - 1/4 cup
Powdered Sugar - 1/2 cup
Water -1 Tbspn
Vanilla essence - 1 tspn


Method

Preheat your oven at 170 deg C and get that out of the way.Spray an 8 inch square baking pan with non-stick cooking spray and line it with parchment/butter paper.Or prepare the baking tray as you usually do while you bake.

In a bowl, toss the shredded carrots, almonds, raisins and 2Tbspn of all purpose flour and mix well with a spoon. Keep aside. This step will prevent the carrots and raisins from sinking to the bottom of the cake while baking.

Now in another large bowl, add sugar,brown sugar and oil. Mix well. Now break in the eggs into them, add vanilla extract and mix well. Now add all the dry ingredients one by one into the bowl,and also add in the shredded carrots/almonds/raisins as well.Mix with a spatula till everything comes together.Pour the mix into the prepared baking tray and even-out the top layer well with a spatula. Bake at 170 deg C for 20 mins. The original recipe called for 176 deg C for 30 min. But my oven heats up pretty quickly and this temperature and baking time worked for me. So if you know your oven , adjust the temperature and timing accordingly.

How to prepare frosting

Make sure the butter and cream cheese are in room temperature.Mix all the ingredients for the frosting till you get a nice smooth creamy texture, add a tbspn of water if needed. You must be able to easily spread the frosting on top of the cake.

After the cake is done [test it by inserting a tooth-pick into the centre of the cake and until it comes out clean], cool it for 30-40 minutes.Once the cake is completely cooled, apply the frosting on top of it. Leave it on for 15-20 minutes till the frosting sets.

Cut a piece of cake and enjoy it along with a cup of hot tea. :)

 
Print this Post

Continue Reading >>

Monday, February 20, 2012

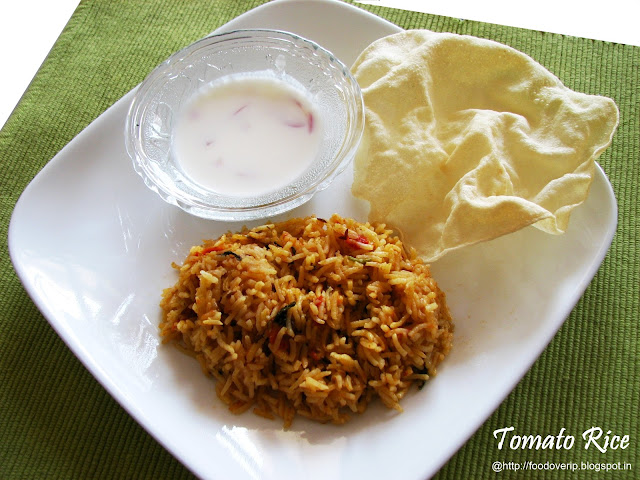
Tomato Rice

Tomato rice is my back-up lunch on saturdays when i wake up and see its 11 AM. ;). And i must say thats a regular too. :P. So tomato rice, papad, raita and TV figures in our lazy saturdays.

I must give credit to S since i learnt this simple recipe from him and there was never turning back for another recipe.It always amazes me that something this simple and easy can taste so wonderful. This is also a quick lunch box item that can be made in minutes. My version uses regular ingredients and none of those extra stuff like coconut milk/curd , peanuts, mint etc is needed.


Tomato Rice


Ingredients

Serves - 2-3
Spice Level - Medium

Tomatoes - 3 large ones [chopped]
Onion - 1 large finely chopped
Green chill - 2 slit lengthwise
Masala/curry/Chilli powder - 2.5 tbspn
Salt - as per taste
Turmeric powder -  a pinch
Coriander leaves - a handful, washed/chopped well

bay leaves - 1
Cloves - 2
Cinnamon - 1 inch stick
Cumin - 1 tspn
ginger-garlic paste - 1 tspn

Long grain Basmati rice  - 1.5 cups
water - 2.25 cups


Method

First wash the rice and soak in water and proceed with the following.

Heat oil in a pan. Add bayleaves , cinnamon, cloves and jeera, let them roast. Add in the onions and green chillis. Give it a stir for a minute or two. Now add the ginger-garlic paste. Saute till onions are translucent. Now throw in the tomatoes, stir it, add little salt and a pinch of turmeric powder. Stir it well for a minute and close the lid. Wait till the tomatoes are soft and  let out juices and it should be mashed well. This will take 10-12 minutes. Now add in the curry powder and saute till the raw smell of curry powder vanishes. This will take a minute. Now add in the corainder leaves, drain the water from the soaked rice, and add the rice too to the kadai and stir well for two minutes. Switch off flame.

Now empty the contents of the kadai in to the electric-pressure-cooker vessel, add 2.25 cups of water and salt. Add enough salt till you can taste the salt slightly in the water. That would be the right amount.Cook for 15 minutes.

Serve with papad and raita. Yumm! :)

Notes

1. Dont forget to soak the rice in water for atleast 15-20 minutes , and ensure to saute the rice along with curry mixture. This will help in  rice standing separately from each other.

2. The ratio of basmati rice to water is always 1:1.5 and not 1:2. I initially used to make it with 1:2 ratio, and ended up with rice sticking to each other or it being a tad overcooked.

3. You can skip  the bayleaf/cinnamon/cloves if you dont have them, it will pretty much be the same.

4. Adding little salt and turmeric to the tomatoes, helps them cook more easily and faster. So whenever you add tomatoes to the kadai , in any recipe, follow it up with little salt, a pinch of turmeric and stir it well to make it cook faster.


Print this Post

Continue Reading >>

Kathirkai Kosmali/Brinjal-Potato stew

Kathirkai kosumali is a very authentic chettinadu dish which best goes as a side dish for idli/idiyappam or dosai's. Its a regular in the breakfast served in our weddings. This is one of my favourite and somehow i dont make it as often as i would like to. I always make this when i have brinjals in excess and need to finish them off.

The dish doesnt look very appealing due to brinjal's color. But looks are definitely deceptive in this case. :)

Kathirkai Kosmali/Brinjal-Potato stew


Ingredients

Serves - 4
Spice Level - Medium

Brinjals - 4 medium sized , each cut into half
Potato - 2 medium sized, peeled and each cut into half
Onion - 1 large , chopped finely
Tomato - 1 medium sized , chopped
Green chilli - 3 slit lengthwise
Garlic cloves - 3 chopped
Thin Tamarind extract - 4-5 Tbspn

Mustard - 1 tspn
Urad dal - 1 tspn
Jeera - 1 tspn
Curry leaves - 1 sprig
Hing - a pinch
Oil - 2 Tspn
Salt - as per taste

water - 3 cups


Method

First , pressure cook the brinjals and potatoes together well with 1-1.5 cup water. Now pick the brinjals and potatoes from the cooker and transfer them to a plate. You should be able to easily peel the outer layer of the brinjals. Thow away the peel/outer layer. Mash the brinjals and potatoes with a ladle.No need to mash the potatoes completely, its good to leave a few potato pieces here and there unmashed [Like in the picture above]. Keep this aside.Save the water remaining in the pressure cooker to add into the curry.

Heat oil in a kadai. Add hing, add mustard , let it crackle, add urad dal, jeera,let them roast, add curry leaves. Now throw in the onions, green chillis and garlic coves. Saute till onions are translucent. Now throw in the tomatoes and add little salt. Stir well , close the kadai with the lid. Stir ocassionally,and saute tomatoes till they are soft and let out the juice.Now add in the mashed brinjal-potato mixture mix well, add 2 cups of water,along with the water in which the brinjals and potatoes were cooked. Add more salt and let it boil for a minute or so. Now add the tamrind extract.Let the stew boil in low flame for 5 minutes. switch off stove.

Serve hot with idli/idayappam/dosai. :)

Notes

1. Add more water if you prefer loose curry

2. While adding tamrind extract tbspn by tbspn, make sure to taste in between, so that it doesnt get too tangy. The way i prepare tamrind extract is more diluted than how it is generally prepared. So adjust the quantity of tamarind extract as per your taste.

Print this Post

Continue Reading >>

Anjappar Hotel Keerai Masiyal

I try to make sure that Keerai masiyal is once a week appreance in my kitchen.Picking the leaves is the most boring job when it comes to keerai and i am instantly reminded of my paati, who used to ask us to help her with this. She always ended up complaining i dont notice the leaves which has the holes in them and discard them, eventually she will let me go and she will do it herself ;).

I once had vegetarian meals in anjappar and they served  keerai masiyal, which i liked so much, that i had more than 3-4 servings. I wanted to replicate it and this is what i had done. Until then i was making keerai in a much more simpler way with less ingredients , the way my mom makes ,which is also tasty.

But once we made this version , we loved it and this recpie is a keeper. Also this recipe has made S like keerai too, who never used to like spinach in any form before.
So if you dont like keerai, try this - it might end up becoming one of your favourite! :)

Keerai Masiyal


Ingredients

Spinach - 2 bunches [picked/washed/chopped]
moong dal - 1/3 cup [Pressure cooked well with a pinch of turmeric]
Green chill - 2 small, slit length-wise
Tomato - 1 finely chopped
Onion - 1 Finely chopped
Garlic cloves - 5 chopped finely
2 cups water

Cumin - 1 tspn
Mustard - 1 tspn
Hing - a pinch
Oil - 2 tspn
Salt - as per taste

Method

Heat a kadai with oil. Add hing ,mustard - let it crackle, add jeera - let it roast. Now throw in the onions , green chilli, and garlic. Saute till the onions are translucent.Add the chopped tomatoes, little salt, cover the kadai, and stir ocassionally till the tomato becomes soft and let out juice.Now add in the spinach leaves and saute them, add in 1 cup water, stir well and close the kadai with a  lid, and let them get cooked well.This should take about 15-20 minutes. After the spinach is cooked well, add in cooked moong dal - dal should be of mashable consistency, add 1/2 cup of water, salt and stir well. Let this boil for another 5 minutes. switch off stove.

Server hot with rice-ghee and Urulaikilangu [potato] masala. That's one satisfying and healthy meal. :)

Notes

1. Never pressure cook spinach, as it will loose all its nutrients. Always cook them in the kadai along with other ingredients in which ever way you make them.

2. Be careful while picking the leaves from the spinach bunch, and make sure to discard the ones which have holes in them.

3. Wash the spinach leaves well with water 2-3 times as it contains a lot of mud particles and dirt.

4. I have tried this preparation with 3 kinds of spinach - palak/methi and paruppu keerai  and its worked well for me. If you try out with any other and comes out good, please do let me know. :)

Print this Post

Continue Reading >>

Thursday, February 16, 2012

Super Easy No-bake Mango Cheesecake

The two words no-bake and cheesecake caught me and i had to try it. This is Valentines' day special dessert, which i wanted to do, but ended up being a day late. But never mind , let me take you to the recipe without further delay.

I consulted many recipes from various sources over the internet and came up with a mixed version. But main recipe reference is from Edible garden

No-Bake Mango Cheescake


Ingredients

Serves 3

Cream Cheese or Hung curd - 1/2 cup
Castor Sugar - 1/4 cup
Fresh Cream - 1/3 cup
Mango pulp - 3/4 cup
Gelatin - 1 tbspn
Mcvities digestive bisuits  powdered - 1 cup
Melted butter - 4Tbspn
Cashews - 5
Sugar - 1 tbspn
Vanilla essence - 1/2 tspn

Method

Base of the cake 

Powder the biscuits along with the cashews and 1tbspn sugar to make about 1 cup. Mix it well with melted butter . Now bring out 3 serving glasses and  spoon this into each of them and press them firmly to make the base of the cheescake.Put it inside the fridge. Let it stay in the fridge while you proceed with the second layer to make the cheescake filling as below.

Cheescake mixture

This consists of the three steps as below

Step 1- Mango pulp - gelatin mix

In a cup, pour about 2-3 tspn of cold water along with gelatin and stir the gelatin with hand. Now add 2-3 tspn of hot water over this - stir and let the gelatin completely dissolve. Mix the mango pulp with the dissolved gelatin and keep aside.

Step 2 -Whipped Fresh Cream 
Whip the fresh cream separately and keep aside.

Final Cream cheese mix

Now mix the cream cheese and castor sugar well for 2-3 minutes to get a smooth texture. Pour 3/4th of the mango pulp mixture prepared in step1 [remaining is to be used for topping] and all of the whipped cream [step 2] and vanilla essence onto the cream-cheese/sugar mixture.

Now take out the glasses from the fridge and fill 3/4 of the glass with the cheescake mixture. Now return to fridge and refreigerate for 1.5 hrs for it to set.

Topping

After 1.5 hrs, bring the glasses, gently spoon in the the remainining mango pulp on top of the cheesecake mixture in each glass. Referigerate for 5-6 hrs, for best results cool it overnight. And there we have our beautiful cheescake ready.

Note:
You can always subsitute hung curd for cream cheese, as cream cheese is expensive and difficult to get in India.But i had tried this recipe with cream cheese.Lucky me! ;).

Gelatin is a meat by-product, so if you are strictly vegan, use chinagrass [agar-agar] instead.

Also the quantities in each layer can be adjusted as per taste/need. I have used more mango pulp mixture for the topping, than necessary.

Print this Post

Continue Reading >>

Sunday, February 12, 2012

Aloo mattar Masala Fry

This is very simple masala stir fry which goes very well with rotis/pulkas/chapthis and the likes. It can also be served as a masala stuffing for dosai and best goes with rasam and rice. :). It is a very quick and easy recipe when you really dont want to spend time for making lunch.

Aloo -mattar Masala Fry


Ingredients

Potato - 3  large ones cubed  [boiled]
Peas - 1/2 cup [boiled]
Onion - 1 large chopped finely
Mutard seeds - 1 tspn
Jeera - 1 tspn
Hing - 1 tspn
Oil - 2 tbspn
Salt - to taste
Turmeric powder - 1/4 tspn
Curry/Chilli powder - 2 Tbspn

Method

Heat oil in a pan. Add hing ,then mustard seeds and when they crackle, add the jeera -let them roast. Throw in the onions, saute till translucent. Now add salt, turmeric and curry powder. Saute till the raw smell of masala leaves and until the onion shines with the oil and masala. Now throw in the boiled peas and potato and wrap well with masalas. Saute it for 3-4 more minutes and switch off flame.

Continue Reading >>

Friday, February 10, 2012

Milagai Chutney

This Onion-Tomato-Coriander-Chilli cutney often comes to my resuce when i want to rustle up a really quick absolutely delicious side dish for dosai/idli/paniyaram/appam/adai and so on - an accompaniment with almost any "batter" based dish.

Milagai chutney


Ingredients

Onions - 3 big chopped roughly
Tomato - 2 chopped roughly
Red Chilli - 3
Coriander leaves - a handful
Mustard seeds- 1 tspn
Urad Dal - 1 tspn
Oil - 2 tspn
Salt - as per taste

To Temper

Mustard seeds - 1 tspn
Urad dal - 1 tspn
Curry leaves - 1 sprig
Oil - 2 tspn

Method

Heat oil in a pan. Add the mustard seeds, and when they crackle, add the urad dal. When the urad dal turns brown, add the onions and saute it just until its about to turn brown. Now add in the chopped tomato and salt and saute it till it becomes soft and gives out its juice. Add the coriander leaves and red chilli, and saute for a minute or two and switch off flame. Cool it and blend into a fine or coarse paste in the mixer. Transfer this to a serving bowl.

Now heat oil in the same pan and add  the given ingredients under "To Temper". Pour this over the chutney. Serve hot with idli/dosai


We had them with godhumai[wheat] dosai's for dinner. :)

Continue Reading >>

Wednesday, February 8, 2012

Cream of Mushroom soup & Corn Cream Filling


So, Here i am Finally. Thanks to S for creating this so that i would atleast start on my food blog which i have been trying to get working on and off for more than a year now.

Cold waves are hitting mumbai and what could be more comforting than a cup of warm soup and masala sandwich for dinner. :) . So without further delay I present to you my first recipe below....ensoiiii!!!

Cream Of mushroom Soup

Ingredients

Mushroom - 1 cup [cleaned and chopped]
Onion - 1 finely chopped
Olive oil - 2 Tspn
Pizza hut Italian seasoning/Dry herb Italian seasoning - 2 packets/2Tbsp
Salt/Pepper - To Taste
Milk - 1 cup
Water - 1 cup

Method

Heat a pan with oilve oil. Add the chopped onions and saute it till translucent. Add the chopped mushrooms now and saute for 3-4 more minutes until it gives over that shiny glaze look. Switch off the stove. Cool and blend in a mixie with 3-4 tbspn of milk.
Now pour the blended mixture on to a pan along with the remaining milk and water and bring to a boil. Now on low heat add the desired salt-pepper and empty the two packets of pizza hut italian seasoning and stir for a few more minutes. Ta Daa! Soups ready. :)

Corn-Cream Filling

This corn filling recipe is adapted from Nags - edible garden

Ingredients
Corn seeds - 1 cup [boiled/pressure cooked]
Onion - 2 finely chopped
Garlic cloves - 5 Finely chopped
Green chilli - 1.5 finely chopped
Red Chilli Sauce - 2 Tbspn
Fresh Cream - 4 Tbspn
Salt - as per taste
Coriander Leaves - a handful chopped.
Oil - 2 Tbspn
Cumin - 2Tspn

Method

Heat a pan with 2 tbspn oil. Add the cumin seeds and roast it. Add the onions, green chilli and chopped gralic and saute till they are translucent. Now add salt and red chilli sauce and saute it for a couple of minutes. Now add the corn seeds and wrap it well with the onion-sauce mix. Keep the stove in sim and add the cream and mix well over low heat for 1-2 minutes. Add the coriander leaves mix well and switch off stove. Serve the filling over toasted bread. :)

Print this Post

Continue Reading >>
Related Posts Plugin for WordPress, Blogger...

A la carte!

Along with idli/dosai (13) Along with rice (32) Along with rotis (21) asparagus (1) baby potatoes (4) bajji (1) baking (9) banana (1) basil (1) basmati (2) beans (1) beetroot (5) bhindi (3) biryani (1) Black eyed beans (2) blueberry (1) bok choy (1) bottle gourd (1) bread (3) breakfast (4) brinjal (4) brocolli (1) buttermilk (1) butternut-squash (1) cabbage (2) cakes (7) carrot (1) carrots (3) cashews (1) cauliflower (8) cheescake (2) chettinadu (24) chettinadu delicacy (23) Chicken (7) chilli (1) Chineese (3) chinese (1) chocolate (1) chole (2) chutney (6) coconut (5) coconut milk (1) coriander (4) corn (1) cow-peas (1) cream-cheese (2) curry leaves (1) dal (3) dates (1) desserts (14) diwali 2013 (1) dosai (1) drink (1) drumstick (2) dry field bean (1) Easy (44) egg (3) fenugreek (1) fish (1) Food and Travel review (1) garlic (9) ginger (1) gobi (1) green gram (1) How To (5) Indian Flat Breads (4) indian sweets (3) International (5) ivy gourd (2) jeera (3) kootu (1) kovakkai (1) lemon (3) lentils (11) lobia (1) malai (1) mango (2) masoor dal (1) Methi (2) mint (2) mix veg (9) mochai (1) moong dal (4) mushroom (10) mutton (1) non-veg (2) onion (2) orange (1) paneer (11) parathas (1) pasta (2) peas (7) pepper (1) pickles (1) plantain (1) poriyal (1) potato (14) potatoes (2) quinoa (1) Rajma (1) rasam (1) rice flour (1) rosemary (2) shallots (1) snack (18) soup (7) soy chunks (1) spinach (6) stir-fry (1) strawberry (1) sweet potatoes (1) tamarind (5) tomato (7) toor dal (1) val bean (1) Variety Rice (13) walnut (1) wheat (2) yoghurt (1) yuuum!! (1) zucchini (2)

Latest on Food Over IP

Copyrights

All rights reserved @2012.

Unless otherwise mentioned, the text and images included in FoodOverIP blog belongs to the author. The blog author’s permission is required before any content is reproduced in any form.

  © Blogger templates The Professional Template by Ourblogtemplates.com 2008

Back to TOP  

Blogging tips