Wednesday, June 27, 2012

Masala Egg Bhurji

I don't like eggs - in any form, but S absolutely loves it. Never tried anything new with eggs, but the usual recipes like omelet/scrambled egg, bhurji seem to be delicious enough for a really quick breakfast. My previous team mates at work were all North Indians and they used praise the
combination of masala egg bhurji wih chapathi. :)

Masala Egg Bhurji


Ingredients

Serves - 2
Spice Level - Moderately spicy
Prep time - 10 min
Cook time - 5 min

Eggs - 2
Onion - 1 small, chopped finely
Coriander Leaves - half a handful, chopped well
Green chilli - 1 , chopped finely
Cumin powder - 1 tsp
Pepper Powder - 1 tsp
Turmeric powder - a pinch
Salt - as per taste.
Oil - 1 Tbsp

Method

Beat the eggs well in a bowl. Add in the rest of the ingredients and give it a quick mix.Heat oil in a small pan. Add the prepared egg mix. After a few seconds, using a ladle stir it off. It will look messy at this stage. Keep stirring every few seconds, until you get a dry mixture like in the pic above. Take off the heat when you think its done as per your need.

You can also make an omelet with the prepared egg-mix if you prefer to have it that way. Try eating this with chapathis, toasted bread - I hear its super delicious especially with chapathi.


Print this Post

Continue Reading >>

Monday, June 25, 2012

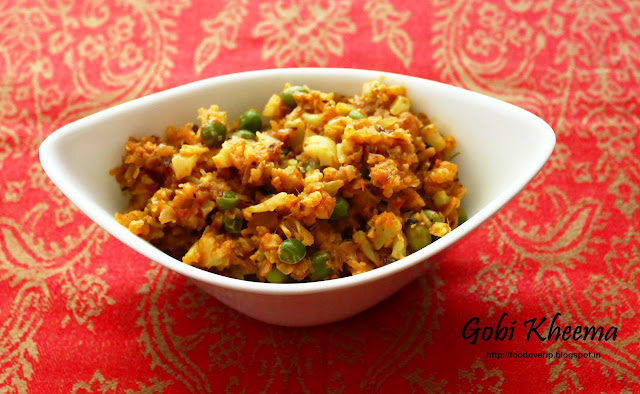
Gobhi Ka Keema/Minced Cauliflower Peas Curry

Here's some food for thought. I was watching this debate show yesterday and the topic was "Has modern life screwed up our happiness?" I would like to say "yes". Gone are those days when great things came in small sachets. When I was growing up, eating out in a fancy restaurant, going to a movie theater, buying a dress,etc used to happen once a while. Not every other month. And when it did happen it truly felt joyous.There were many a times when my parents did not buy me stuff that I had really wanted.Not that they couldn't afford it , they just wanted me to understand that the word "NO" existed. Fair enough?

In this absurd era, everything is in excess. We buy what we want when we want it. After a quarter of year gets over, if we don't take that "much needed" holiday, we feel so stressed.While our parents who have been working for at least >30 years now, would have taken how many vacation to exotic places, 2-3 maybe? .To say life is so very materialistic now would be an understatement. More often than not, this question about what would give me happiness in the true sense of the word pushes me to one corner, scaring me that i would never find it.

On the flip side, the 21st century has its own accomplishments too. Freedom for women, women empowerment, no explicit discrimination based on cast/creed/color/language and so many more
things.

The show ended on a great note, saying what we do need to do is customize our lifestyle based on our needs.Lets sit back , think and make an effort to be happy. By indulging in these materialistic pleasures more than necessary,we are distracted from the real pursuit to happiness.Life is not about romantic-getaways,hi-tech gadgets,fancy candle-light dinners and overseas jobs. Don't be a saint, that's not what I am getting at, actually far from it. Just be aware of your needs ,make time for your parents,lead a balanced lifestyle, and don't go overboard. :)

Take a kit-kat break if that was too much of an over-kill ;)

So on to some lighter stuff now such as Gobhi Ka Keema. :). I loved the idea of making a keema curry with gobi and I wanted to try it.It indeed did taste like a how a non-veg keema would. Go on, try it and tell me how much you like it. ;)

Gobi Ka Keema


Ingredients

Recipe adapted from here

Serves - 4
Spice Level - Moderately Spicy
Prep Time - 20-30 minutes
Cook time - 20 Minutes

Cauliflower - 1 Medium, Cleaned and chopped finely
Fresh/Frozen peas - 1/4 cup boiled.
Onions - 2 medium, chopped well
Ginger-garlic paste - 2 tsp
Tomatoes - 3 big, pureed
Turmeric - 1/2 Tsp
Red chilli powder - 1 tsp
Garam masala - 2 tsp
Salt - to taste
Oil - 3 tsp + 2 tbsp
Bay leaves - 1
Cumin seeds - 1 tsp


Method

Heat 2 Tbsp oil in pan and add the chopped cauliflower. Saute till the pieces turn a shade of light brown.Keep aside.Take another kadai and heat 3 Tspn oil. Add the bay leaf, jeera - let it roast. Add in onion and ginger-garlic paste and saute well. Add the red chilli powder, garam masala and saute well.Let the raw smell of the spice mix vanish. Add the tomato puree at this stage , and let it boil. Let the raw smell of the tomato puree disappear. Now add in the cauliflower and peas, salt and let it cook in the gravy.Let it get cooked until you get a thick gravy and all ingredients have blended well.

Serve with pulka/chapathi.


Print this Post

Continue Reading >>

Friday, June 22, 2012

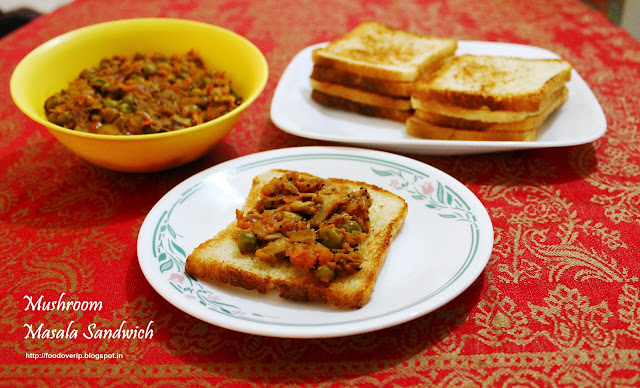
Mushroom Peas Masala

Making somebody like a veggie that they are not fond of  is easy, just cook it in a tasty manner. :). S used to strictly avoid eating mushroom/spinach/adai/beans/ before our wedding.I had to persuade him the first time to try all of these at least once and later decide for himself if he wanted a second serving or not. And good for me, he likes all of these veggies now. :)

I clearly remember the first time I made this dish, way back in 2009,one month into my wedding. Nice spicy mushroom masala served with ghee toasted bread for breakfast. It was so yummy, we ended up packing the same for lunch. Since then , this dish has been a hit at my home. :). One small change in 2012 - we stopped using ghee for toasting bread, you know why!  ;)

Mushroom Peas Masala


Ingredients

Serves - 4
Spice Level - Quite Spicy
Prep Time - 20 Min
Cook time - 20 Min


Mushroom - 200 gms, cleaned and chopped well
Frozen peas - 1/2 cup.
Onion - 1 Large, chopped well
Tomato - 2 and half large ones, chopped
Ginger-garlic paste - 1 Tbspn
Turmeric powder - 1/2 Tsp
Chilli/Curry/Masala Powder - 2 Tbspn
Salt - as per taste.
Oil - 2 Tbspn
Jeera - 1 tbspn
Hing - a pinch

Method

Boil a cup of water, simmer flame and add the frozen peas to it. Let the peas get cooked for about 5 minutes.Switch off flame once peas is cooked. Drain the water and keep the peas aside  If using fresh peas, cook it as you would usually do.

Heat oil in a kadai. Add hing. Add jeera, and let it roast, giving a nice aroma.Add onions, ginger garlic paste and saute well until the onions are cooked well. Add tomatoes, half the quantity of salt needed, turmeric powder, and saute well. Cover the kadai with a lid for few minutes. Let the tomato get mashed well, it should let out the juice and be soft. At this stage add the masala powder and saute for a minute. Wait for the raw smell of the masala to vanish. Add the chopped mushrooms now, and wrap well with the masala. Add 1/2 cup water. Simmer the flame and close the lid. Wait for the mushrooms to get cooked. This would take about 15 minutes. Mid-way, when the mushrooms are half done, add in the cooked peas and combine well. Stir once, add remaining salt and cook in open flame. Wait for most of the water content to evaporate and a nice thick gravy is formed.Switch off flame.

Serve as a side dish for toast, or with roti's, or with rice. Goes well with just about anything. :)


Print this Post

Continue Reading >>

Tuesday, June 19, 2012

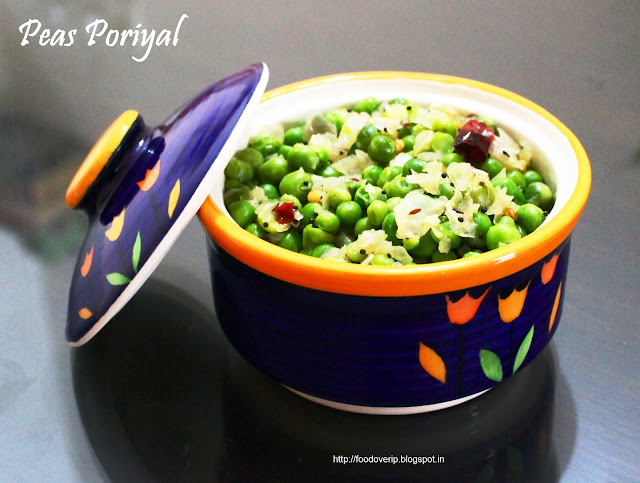
Green Peas Stir Fry/Pattani Poriyal

Again one of the very easy and quick stir fry dish if you have frozen peas sitting in your refrigerator. Rasam rice and Peas poriyal is like comfort food for us. The dish is simple and tasty and will keep you wanting for more. Easy lunch box side dish for rice.

Green Peas Poriyal/Pattani Poriyal


Ingredients

Serves - 4
Spice Level - Moderately Spicy
Prep Time - 5 minutes
Cook time - 10 minutes

Frozen/Fresh Peas - 2 Cups
Onion - 1 Large , chopped well
Dry Red chilli - 4-5
Hing - 1.2 Tsp
Jeera/Cumin - 1 Tbsp
Mustard - 1 Tsp
Urad dal - 1 Tsp
Salt - as per taste
Oil - 1 Tbsp


Method

Boil a cup of water, simmer flame and add the frozen peas to it. Let the peas get cooked for about 5 minutes.Switch off flame once peas is cooked. Drain the water and keep the peas aside  If using fresh peas, cook it as you would usually do.

Heat oil in a kadai. Add hing. Add mustard, wait for it to crackle, add urad dal and jeera and let them roast to a light brown. Break the red chillies and add them in too, saute for a few seconds. Toss in the chopped onion now and saute till translucent. Add the peas and salt at this stage and saute well for 5 minutes. Keep stirring in between.Taste to see the salt level, add more if needed now.Saute till you feel the rawness of the peas disappear and it is mixed well with the tempered ingredients.Switch off flame.

Serve with steamed rice and rasam.


Print this Post

Continue Reading >>

Thursday, June 14, 2012

Orange Zest Buttermilk cake with Chocolate frosting

We had a lovely weekend celebrating S's birthday in Lonavala.Both of us were a little sick , with cough/cold etc, nevertheless it was an enjoyable two days. And whats a birthday without some lovely cake. ;).


S loves orange and I chose to make an orange cake for this birthday. It came out super yum and looked absolutely delicious. :) . This orange cake is quite soft and moist since it has buttermilk in it,the orange taste comes along with every bite as Raaga rightly said so in her post.And the chocolate frosting complements the citrus taste quite well.

Orange Zest Cake with Chocolate frosting


Ingredients

Adapted from Singing Chef

Serves - 8 large pieces
Prep Time - 20 minutes
Cook time - 1 Hour


All purpose flour - 1.5 cups
Unsalted Butter - 1/2 cup [room temperature]
Castor Sugar - 1 cup
Eggs - 2 [room temperature]
Baking powder - 1/2 Tsp
Baking soda - 1/4 Tsp
Salt - 1/2 Tsp
Buttermilk - 100 ml
Vanilla extract - 1 Tsp
Orange juice - extracted from 1 orange
Orange zest - from 1 orange
Orange food color - 1 Tspn

For chocolate frosting

Dark Chocolate - 1/4 cup
Butter - 2 Tbsp
Sugar - 1/4 cup
Milk - 1/4 cup.
Coarsely powdered almonds - 2 Tbsp For decoration


Method

How to make Buttermilk

Take a cup and add a 1 Tbsp white vinegar and fill the cup till the top with room temperature milk . Keep aside for 5-10 minutes. The milk will curdle,give it a stir now.Your buttermilk is ready.You can use as much as needed as per the recipe.

Cake

Preheat oven to 180 deg C and line/grease a 10 inch round tin. I use butter paper to cover the bottom of the cake pan and spray on top of it with non-stick cooking spray

Sift all the dry ingredients - flour,salt,baking powder, baking soda. Set aside.

In a bowl, cream the butter and sugar well.Add one egg at a time and beat well after each addition.Add the buttermilk and vanilla extract and combine well again.Add orange juice and zest and give it a stir. Add the sifted dry ingredients gradually little by little along with orange food color and combine well.

Pour the prepared cake mix into the prepared cake tin and bake at 180 deg C for 30 minutes or until a toothpick inserted into the center of the pan comes out clean.You can then grill the cake for 3-5 minutes at 180 deg C to get the browning on top of the cake if you prefer to.

Cool the cake for 20 minutes before removing it out of the pan. Cool completely before pouring frosting on top of the cake.

Chocolate frosting

You need to use a double boiler method for this.In this method, you don't melt the chocolate directly. Pour a few inches of water into a large saucepan and place a smaller saucepan so that it’s base sits in the water. Put the dark chocolate in the smaller saucepan and bring the water to a low boil.Once the chocolate starts to melt, add in butter, milk and sugar and keep stirring until everything combines well.The mixture will start to froth up and thicken at one point, that's when you switch off the flame.Let it cool for 15-20 minutes.

Once the cake and frosting have cooled down, pour the frosting on top of the cake. Chop up some almonds coarsely and decorate the cake by putting some on the top of the cake.


Print this Post

Continue Reading >>

Monday, June 11, 2012

Chicken Schnitzel

Little did i know about chicken schnitzel when I made it. I googled later to find out what schnitzel meant. The below is the wiki description of this dish.:).

Chicken schnitzel is a traditional Austrian dish made with boneless meat thinned with a hammer, coated in bread crumbs and fried. It is a popular part of Viennese, Austrian cuisine and German cuisine. In Austria, the dish called Wiener Schnitzel (Viennese schnitzel), is traditionally garnished with a slice of lemon and either potato salad or potatoes with parsley and butter.

Me and S have been on a low/no carb diet for a couple of weeks now. So all types of food which are protein rich catch my eye.I saw this simple dish in the Master-Chef Australia show and decided to try my hand at this. It turned out well and here goes my first dish with an international twist.

Chicken Schnitzel

 
Ingredients

Serves - 2
Spice Level - Not spicy but flavorful
Prep Time - 20 minutes
Cooking time - 15 min

Chicken Breast pieces [boneless] - 4
Toasted Bread - 8 slices
Parsley leaves - a handful
Thyme - a Handful
Parmesan cheese - 50g
Salt - 1 Tspn + 1 Tspn + 1 tspn
Pepper 1 Tspn + 1 Tspn + 1 tspn
All purpose flour - 1/2 cup
Egg - 1
Olive oil - for sauteing the chicken pieces

Cling film - 1 sheet
A hammer or hammer shaped tool for flattening/thinning the breast pieces


Method

Wash/clean the chicken breast pieces and slice them into pieces with approx 1 inch thickness and around 5 inches in length.Place the sliced pieces on a wooden slab and cover the top of wooden slab with a cling film.Use the hammer/hammer shaped tool and slightly pound/tap the breast pieces to flatten/thin them down. A few taps on each piece until they are evenly thinned.Keep aside.

Gather the toasted bread pieces , cheese , parsely , thyme , 1 Tsp salt , 1 Tspn pepper into your food processor and pulse it until you get the bread crumbs texture.This is your herbed bread crumb mixture. Keep aside.

Break the egg into a bowl and add 1 tsp salt and 1 tsp pepper , mix well and keep aside. Gather the all purpose flour in a bowl and mix it with 1 tspn salt and 1 tsp pepper and keep aside.

Now take a chicken piece , dip in flour, make sure its coated well with flour. Then dip the flour coated chicken piece in egg and coat well. Next step is to coat this piece with the herbed bread crumb mixture. Make sure its coated well with the bread crumbs, that forms the crunchy outer texture of the chicken.Repeat for all chicken pieces and arrange on a plate.

Take a pan, add 2-3 tbsp olive oil on it and heat it.Place one of the coated chicken pieces on the pan. On low heat, let it get cooked/browned. Once the bottom browns flip it to brown/cook the other side. Transfer to a plate.Repeat for all chicken pieces.Each piece will take about 3-4 minutes to cook well.

Serve with Tomato ketchup and lemon pieces.


Print this Post

Continue Reading >>

Friday, June 8, 2012

Bhindi masala for Roti/Pulka

This bhindi masala goes quite well with pulkas or rotis or even with rice. I usually make bhindi in a very simple manner with mild spices in a poriyal/vadakal kind of a way more suited along with rice. I wanted to replicate the bhindi masala served in tandoori restaurants as a side dish for rotis. This is my version and it turned out to be a super hit

Bhindi Masala


Ingredients

Serves - 2
Spice Level - Moderately Spicy
Prep time - 20 minutes
Cooking time - 20 Minutes


Bhindi/Ladies Finger - 1/2 kg [Cut into half and slit lengthwise]
Green Chilli - 3 ,slit lengthwise
Onion  -1  Large, chopped lengthwise into medium pieces
Turmeric - 1/2 Tspn
Curry/chilli/Masala Powder - 1 Tbspn + 1 Tspn
Cumin/Jeera - 1 Tbsp
Mustard - 1 tspn
Hing - 1/4 Tspn
Oil - 4 Tbspn + 2 tBspn
Salt - as per taste

Method

Gather the chopped bhindi in a microwave bowl. Add 2 Tbspn oil, 1 tspn salt,1 tspn chilli powder to the bhindi and stir well. Microwave on high for 7-9 minutes, stirring once or twice in between. Keep aside. this will make the bhindi less gooey when cooking later.

Heat 4 Tbspn oil in a kadai. Add hing,mustard,jeera. Let it roast. Add in the onions and green chilli and turmeric powder. Saute well till the onions are cooked well.Now add in the bhindi, remaining chilli powder and salt and on low flame, keep stirring now and then till the bhindi is done well.It would take around 20 minutes for the bhindi to be cooked well. When it starts to get slightly crispy, the dish is done.Switch off flame.

Serve with pulka/roti or with sambar and rice.


Print this Post

Continue Reading >>

Tuesday, June 5, 2012

Eggless Dates cake

The moment I saw Lavi's post on Egg-less dates cake and how it tastes like adhirisam , I wanted to try it as S likes adhirisam a lot. I made this as a surprise cake when S returned home after a business trip overseas. I never mentioned to him about it being a "dates" cake. I was sure he would decide it wouldn't taste good even before eating a tiny piece of it. :).

He liked the cake and confirmed it indeed did taste a little like adhirisam and only later i revealed it was a dates cake. So something healthy in a cake. ;)

Eggless Dates Cake


Ingredients

Recipe Source - Home cook recipes

Serves - One eight inch square cake , 8-10 medium sized pieces
Prep time - 20 minutes
Cooking/Baking time - 30-40 minutes

Seedless Dates - 18
Milk - 3/4 cup
Sugar - 3/4 cup
All Purpose flour - 1 cup
Oil - 1/2 cup [Rice bran or any odorless neutral oil]
Baking soda - 1 tsp
Cashews, Badam [chopped] and raisins - 1/3 cup


Method

Preheat the oven to 170 deg C. Spray an 8 inch square cake pan with non-stick cooking spray and line with butter paper.

Boil the milk first and keep aside. When the milk is warm, add in the dates and let them soak in it for 2 hours. Now pour this in your mixer/blender jar along with sugar and blend it to a smooth paste.Add oil and blend again. Pour this filling into a large bowl now.

Mix the flour and baking soda together. Take a tbsp of the this flour and mix with 1/3 cup of badam,cashews and raisins and keep aside. This will prevent the dry fruits from sinking to the bottom of the cake.

Now add the flour into the blended milk-dates-sugar-oil gradually a tablespoon by tablespoon. Do not add large quantities of flour and try to mix them, it would create a lot of lumps. Once the flour has been fully mixed , add the badam,cashews and raisins and mix well.

Now pour this mix into the prepared cake pan. Bake for 30 minutes at 170 deg C or until a toothpick inserted through the center of the cake comes out clean. Allow the cake to cool down for 10-15 minutes and then remove it out of the pan.Cut into different slices and hog. :). Once cooled down completely store the remaining in an air-tight box and refrigerate . We enjoyed it as our breakfast for 3 days. :)

Serve warm with vanilla ice cream or with a cup of tea/coffee.


Print this Post

Continue Reading >>

Sunday, June 3, 2012

Green Peas Masala

Green Peas masala serves as a good spread on a bread toast or as a side dish for rotis , chapathis or with curd/rasam rice. Its a very simple dish , which can be made quite quickly if you have frozen peas sitting in the freezer. Its my savior on those days when i get up late and have to pack a quick lunch for work, and don't have time to spend on chopping veggies.

Green Peas Masala


Ingredients

Serves - 3
Spice Level - Moderately Spicy
Prep time - 10 min
Cooking time - 20 minutes

Fresh/Frozen green Peas - 1 1/2 cups
Onion - 1 Large, chopped well
Tomato - 2 Large , 1 chopped well and 1 pureed.
Chilli/Curry powder - 2.5 Tbsp
Turmeric - 1/2 Tsp
Salt - as per taste
Ginger Garlic [GG] paste - 1 Tspn
Jeera/Cumin - 1 Tspn
Mustard - 1 tspn
Hing - a pinch
Oil - 2 Tbspn


Method

Firstly boil the frozen peas in 2 cups of water for 5 minutes or microwave on high for 5 min. Drain and keep aside.If you are using fresh peas, pressure cook them to the right extent.

Heat oil in a kadai. Add hing,mustard - let it splutter, add jeera - let it roast. Add in chopped onions and GG paste. Saute till onions are done. Now toss in the chopped tomato , tomato puree and half the amount of salt and turmeric. Let the tomatoes cook well and get mashed completely.Add the chilli powder and wrap well with the onion tomato mix. Saute till the raw smell of masala powder vanishes. Add about 1/2 cup water and the remaining salt and add in the cooked peas and mix well.Check to see if more salt/spice is needed at this stage , add if needed now.Cover the kadai with a  lid. Simmer flame and let the peas boil in the gravy for a few minutes until it thickens.Once the gravy thickens ,switch off flame.

Serve with rotis, chapathi , curd/rasam rice or on bread toast.

Notes


You may also use dry peas. If using , soak them overnight and pressure cook the peas to the right extent before making green peas masala.


Print this Post

Continue Reading >>
Related Posts Plugin for WordPress, Blogger...

A la carte!

Along with idli/dosai (13) Along with rice (32) Along with rotis (21) asparagus (1) baby potatoes (4) bajji (1) baking (9) banana (1) basil (1) basmati (2) beans (1) beetroot (5) bhindi (3) biryani (1) Black eyed beans (2) blueberry (1) bok choy (1) bottle gourd (1) bread (3) breakfast (4) brinjal (4) brocolli (1) buttermilk (1) butternut-squash (1) cabbage (2) cakes (7) carrot (1) carrots (3) cashews (1) cauliflower (8) cheescake (2) chettinadu (24) chettinadu delicacy (23) Chicken (7) chilli (1) Chineese (3) chinese (1) chocolate (1) chole (2) chutney (6) coconut (5) coconut milk (1) coriander (4) corn (1) cow-peas (1) cream-cheese (2) curry leaves (1) dal (3) dates (1) desserts (14) diwali 2013 (1) dosai (1) drink (1) drumstick (2) dry field bean (1) Easy (44) egg (3) fenugreek (1) fish (1) Food and Travel review (1) garlic (9) ginger (1) gobi (1) green gram (1) How To (5) Indian Flat Breads (4) indian sweets (3) International (5) ivy gourd (2) jeera (3) kootu (1) kovakkai (1) lemon (3) lentils (11) lobia (1) malai (1) mango (2) masoor dal (1) Methi (2) mint (2) mix veg (9) mochai (1) moong dal (4) mushroom (10) mutton (1) non-veg (2) onion (2) orange (1) paneer (11) parathas (1) pasta (2) peas (7) pepper (1) pickles (1) plantain (1) poriyal (1) potato (14) potatoes (2) quinoa (1) Rajma (1) rasam (1) rice flour (1) rosemary (2) shallots (1) snack (18) soup (7) soy chunks (1) spinach (6) stir-fry (1) strawberry (1) sweet potatoes (1) tamarind (5) tomato (7) toor dal (1) val bean (1) Variety Rice (13) walnut (1) wheat (2) yoghurt (1) yuuum!! (1) zucchini (2)

Latest on Food Over IP

Copyrights

All rights reserved @2012.

Unless otherwise mentioned, the text and images included in FoodOverIP blog belongs to the author. The blog author’s permission is required before any content is reproduced in any form.

  © Blogger templates The Professional Template by Ourblogtemplates.com 2008

Back to TOP  

Blogging tips