Thursday, August 30, 2012

Kadai Paneer

For a person who wasn't fond of paneer much, the last one year has made such a big change. If I go too long without having paneer curry, I start longing and dreaming for it. But considering the heavy fat content in it, we have to restrict ourselves to only once a month or so.  Kadai Paneer is one of my favorite among the various paneer dishes, I think the mix of freshly grounded spice, capsicum and paneer just sing along so well. I am sharing a quick version of kadai Paneer today, there are a couple of more elaborate methods to make this -- I shall reserve that for another time. :)

Kadai Paneer


Ingredients

Serves - 3
Spice Level - Moderately spicy
Prep time - 15 min
Cook time - 10 min


Paneer -  150 gm , cubed
Onion - 1 sliced thinly
Tomatoes - 1 1/2 [to grind] , 1 chopped well
Capsicum - 1 chopped into medium sized pieces
Coriander seeds - 2 tsp
Dry Red chilli - 1
Green chilli - 1
Cashews - 5-6
Garam Masala - 1 Tsp
Kasoori Methi - 1 Tsp
Red chilli powder - 1 tsp
Oil - 3 Tbsp
Water - 1/3 cup
Fresh Cream - 3 Tbsp [optional] .


How do you do it

Dry roast the coriander seeds and red chilli for a minute or two in low flame until you get a good aroma and grind it into a coarse powder. Take 1 1/2 tomatoes, green chilli , cashews and grind along with this coarse powder to form a puree . Keep aside.

Heat a pan, add a tbsp of oil. Arrange the cubed paneer pieces on the pan and let it roast until it starts to brown, flip the paneer cubes to slightly brown the other side too. Transfer the pieces to a tissue paper, and pat it with another tissue paper to remove the oil. Now put these paneer pieces in about a cup of lukewarm water for 15 minutes [This is done to keep the paneer pieces soft yet firm] . Drain again and remove water with tissue paper and keep aside. We saute the paneer pieces to firm them up and make sure they don't get squashed when finally added into the curry. [This step is optional, you may add in fresh paneer if you like it that way].

Now in the same pan, add 2 Tbsp oil. Add onions , saute till translucent. Add the chopped tomato , little salt and cook till tomatoes become soft . Now add the puree made initially and let it cook for 1-2 minutes. Add in the chilli powder, garam masala,kasoori methi and mix well with puree. Add 1/3 cup water , add the capsicum too now. Let the capsicum cook in the gravy for 2-3 minutes, let it be crunchy. Simmer flame and you can add a few tbsp of cream at this stage for a richer texture and taste, I dint use it though. Add remaining salt and when the gravy starts to thicken ,add paneer pieces and  wrap well with the gravy. Let it cook for a couple of more minutes.Switch off flame.


Serve with pulkas and some lassi on the side. Makes for a delicious dinner. :)

 
Print this Post

Continue Reading >>

Tuesday, August 28, 2012

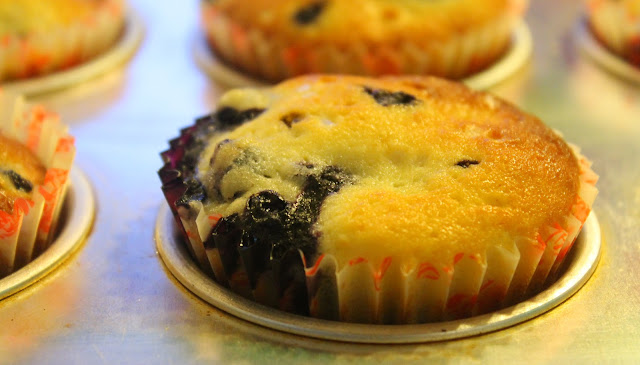
Blueberry muffins with Lemon zest

Right from the time I started baking muffins, i have been looking for fresh blueberries everywhere.Blueberries are such a rarity here in India. In-fact I have never seen them before, even in those specialty stores. But I guess it makes sense not to import them , nobody would buy them, they cost a bomb here. I have made these blueberry muffins once, a couple of years back for a family get together using dry blueberries, this time was a repeat of the same recipe but with FRESH blueberries. All the way from Netherlands :-) .

Every time I shop at Godrej Natures basket, I am like a kid in a candy store, wanting to just take it all in, trying to look at so many racks all at the same time! :D. So many ingredients I have heard/seen in cooking shows but haven't had the chance to explore yet!  This time when I went in , they had a huge board saying the exotic fruits like blueberries/passion/peaches were available and the joy that bought me, ah!!. Immediately without a second thought I picked up the only box of blueberries left and continued shopping debating all the time if I should leave the box back. Four hundred forty Rs for 150 gm of blueberries was oh so too much!. S convinced me that I should buy it and the blueberries came home with me. :) After I baked the muffins and tasted them I would definitely have to say Paisa Vasool ;). They were brilliant, soft/moist muffins with the sweet-sour blueberries bursting in your mouth every bite. Heaven!

Blueberry muffins


Ingredients

Serves - makes 9 muffins
Prep Time - 15 min
Cook time - 30 min


All purpose flour - 1 1/4 cup
Salt - 1/2 + 1/4 tsp
Baking powder - 1 + 1/4 tsp
Unsalted Butter - 90gm [ room temperature]
Castor Sugar - 3/4 cup
Sour milk/Buttermilk - 1/2 cup [at room temp]
Vanilla - 1 Tsp
Lemon zest - of one lemon
Fresh blueberries - 3/4 cup
Eggs - 2 [ at room temp]
Normal sugar -  2 Tbsp


How do you do it.

Mix the flour,salt and baking powder well sift/sieve it once and keep aside. Take 2 Tbsp of the sifted flour and add it to the blueberries and toss it so that they get wrapped in flour. This is to prevent the blueberries from sinking to the bottom of the muffin while baking.

Pre-heat oven to 180 deg C. Line the muffin tray with muffin liners.

Cream the butter and castor sugar together until smooth and creamy. Break in the eggs and mix until its incorporated well with butter-sugar.Add the vanilla essence, lemon zest ,sour milk  and mix until you get a smooth/creamy mix. Now add in the flour fully and mix gently until the flour is fully mixed. DO NOT OVER-MIX. Over-mixing will ruin the muffins. It should take you 10-12 strokes to fully mix the flour. Then fold in the blueberries with this batter , take care not to mash it.

Scoop this batter and fill each muffin cup with the batter such that its 3/4 full. Use the normal sugar and sprinkle on top of each muffin. This gives  a nice crunch to the muffins. Bake at 180 deg C for 25-30 minutes or until a toothpick inserted into the center of the muffin comes out clean. Grill for 3-4 min at 180 deg C to get the golden browning on top.

Once done, remove the tray out of the oven. Cool it on a wire rack for about 15-20 minutes. Enjoy with a hot cup of cappuccino. :)

Notes

1. Do not over-mix the batter. Over-mixing will cause the muffins to be hard.

2. Always use muffin liners , you don't have to grease the muffin tray in this case. And they come out of the pan without any drama. Much easier.

3. Fill up-to 3/4 [recommended] , if you fill them up-to the brim, they might peak and you might get flying saucer like muffin tops which we don't want. Some like the head to be really jumbo, if thats the case, you can fill them up-to the full level.


4. Always start with ingredients at room temperature.


Print this Post

Continue Reading >>

Sunday, August 26, 2012

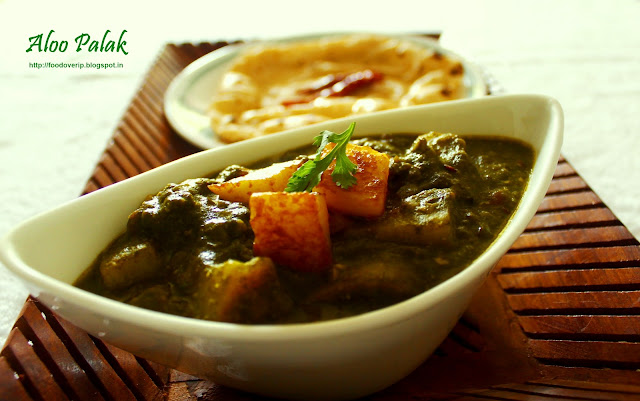
Aloo Palak/Potatoes in Spinach gravy

After the success of palak paneer, I am more comfortable trying palak based dishes with the confidence that they can actually taste quite nice. Never made aloo palak before, neither have I tasted it elsewhere, I thought it would be a good match - aloo and palak and it was!. It makes a good side dish for roti as well as rice.  Whenever palak dishes become a hit at home, it makes me very happy because healthy delicious dishes are the way to go!  :)

Aloo Palak


Ingredients

Serves - 4
Spice Level - Moderately spicy and falvorful
Prep Time - 20 min
Cook time -  20 min

Potato - 2 large chopped into medium sized pieces
Palak - 1 bunch [ 250 - 300 gm]
Tomato - 2 Large [ chop one tomato into small pieces, cut the other tomato into two halves]
Cashews - 8
Onion - 1 Large finely shopped
Green chilli - 3
Chilli/Masala powder - 1 Tsp + 1 Tbsp
Mustard - 1 Tsp
Jeera - 1 Tsp
Garlic cloves - 4 large , chopped well
Oil - 1 Tbsp + 2 Tbsp + 1 Tbsp
Sugar - 1 Tsp
Salt - as per need

How do you do it

1. Firstly heat 2 Tbsp oil in a kadai , add the chopped potato pieces, a tsp salt and 1 Tbsp chilli/masala powder and saute till it has a slight golden color and is cooked well. Drizzle water in between to make the potatoes cook faster.Keep aside.

2. Wash and chop the palak leaves roughly [ remove stem]. Bring a cup of water to boil, add in palak leaves, cashews , a Tsp of sugar, green chillies and cut one tomato in half and drop it in. Let it boil for 3-5 minutes until the palak leaves are tender and tomato is blanched well. Remove from flame, drain the water but reserve it.Cool it for 10 minutes and blend all of it to form a puree along with reserved water. Keep aside.

3. Heat  1 Tbsp oil in a kadai, add chopped onion , saute till translucent. Add in the chopped tomato pieces and saute well until the tomatoes are soft. Add a tsp of salt and a pinch of turmeric for the tomatoes to cook faster. Add a tsp of chilli/masala powder and let it cook until the raw smell of the powder vanishes.Now add in the palak puree prepared in step 2 , remaining salt and bring to boil. Simmer flame, Add in the potato pieces from step 1 and let it boil slowly. Adjust consistency at this stage - add more water if needed if the gravy is too thick

4. Heat 1 Tbsp oil in another small pan, add mustard, jeera, let them roast. Add in the chopped garlic pieces and let it brown slightly. Pour this tempering on to the boiling palak curry , mix well and switch off flame.

Serve with soft and hot pulkas

Notes

1. Since the tempering in step 4 has garlic in it, the garlic flavour comes out well in the curry. If you prefer the garlic flavor to be very mild, I would suggest you add the garlic in step 3 while sauting along with onions.

2. Instead of sauteing potatoes, you may also just boil the potatoes with little salt and keep aside and later add to gravy in step 3.


3. Once palak is cooked it needs to be removed from the hot water to retain color, and adding 1/2 tsp sugar while cooking palak is also for the same reason.

Continue Reading >>

Thursday, August 23, 2012

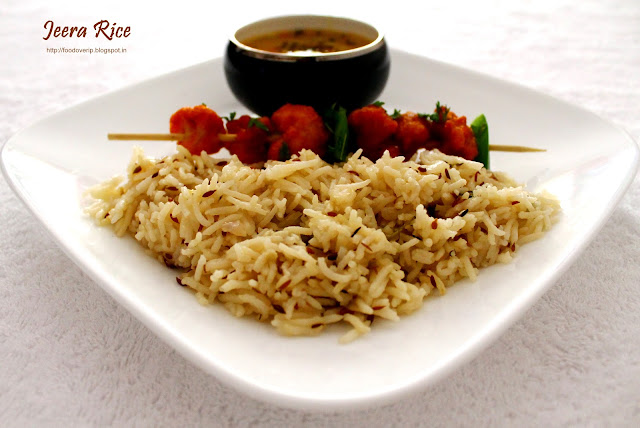
Jeera Rice

It just cant get any simpler than Jeera rice :-) . Jeera rice is a very humble north Indian rice dish packed with jeera flavor that just needs 5 minutes of your time and it goes best with dal which is another easy accompaniment. First few months after my wedding, if you have had food at my place, theres no way you could have missed this . So if your newly married , beginner in cooking or just another person who is in need of a quick fix lunch/dinner menu try this - jeera rice, dal, potato roast , raitha ,a good drink - all in 1 hours time!  Its called the "Just Married" menu  ;).

Jeera Rice


Ingredients

Serves - 2
Spice Level - Not spicy but flavorful
Prep Time - 5 min
Cook time - 15 min


Basmati Rice - 1 cup [washed and soaked in water for 10 min, drain and keep aside]
Jeera - 4 Tbsp
Onion - 1 , chopped well
Green chilli - 1 , slit lengthwise and cut in half
Ginger-Garlic [GG] paste - 1/2 Tsp
Coriander leaves -  a handful, chopped
Salt - as per need
Oil - 2 Tbsp
Water - 1.5 cups

How do you do it

Heat oil in a kadai. Add jeera and let it roast and give a nice aroma - few seconds. Add in the chopped onions and green chilli, GG paste and saute till onions are translucent. Now add in the coriander leaves, basmati rice and saute well for a few 1-2 minutes. Now empty the contents into your rice cooker , add 1.5 cups of water, required salt and cook for 12-15 minutes.

Serve warm with yellow dal tadka

Notes

You might also cook the rice separately for 12 minutes and cool it and mix well with the tempering to retain white color of the dish , but the rice cooker method is quicker.


Print this Post

Continue Reading >>

Sunday, August 19, 2012

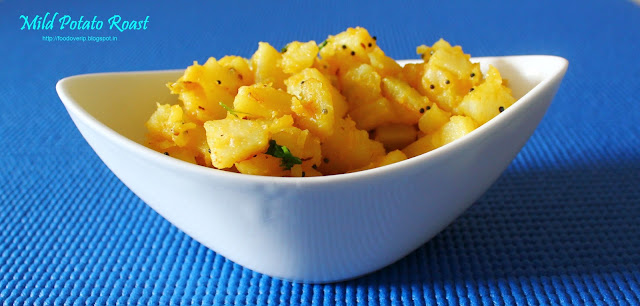
Mildly Spiced Potato stir-fry

Great timing for this post, but not so great for me :|. I have not been keeping well the last couple of days , so its been comfort food all the while and not the usual special cooking on weekends. Whenever me or S is down with throat infection/cold/cough we end up making pepper-garlic-jeera rasam with mildly spiced potato stir fry, its a quick lunch that can be made under 30 minutes and it really comforts you when your sick.

I must definitely add this here, S has been very nice and sweet and has taken over all the household chores for the last two days, and all I have been doing is eating and sleeping. And guess who has been helping him with the recipes - foodoverip :).

Mildly spiced Potato stir fry


Ingredients

Serves - 2
Spice level - Mild
Prep Time - 10 min
Cook time - 5 min


Potato - 5  , peeled and chopped into medium sized pieces and boiled correctly , it needs to be on the softer side [I microwaved it for 4 minutes]
Oil - 1 Tbsp
Mustard - 1 Tsp
Jeera - 1 Tsp
Dry Red chilli - 1
Turmeric - a pinch
Curry leaves - 1 sprig
Hing - a pinch
Salt - as per need

How do you do it

Heat oil in a kadai. Add hing, add mustard and let it splutter. Add jeera and break the dry red chilli and toss it  in too along with curry leaves. Now add in the potato pieces, a pinch of turmeric and salt and wrap well with the tempering. Saute for a couple of minutes. Switch off flame. That simple!

Serve with hot rasam and rice. 


Print this Post

Continue Reading >>

Friday, August 17, 2012

Garlic pull-apart rolls [Eggless] - A Tribute to Julia Child

Happy 100th to Julia Child :) . For those who don't know, Julia Child was a very famous American chef who mastered french cooking and revolutionized American cuisine through her approachable version of a sophisticated French cooking school,TV cooking shows and award-winning cookbooks.

To know about Julia Child read here. Also if you are into cooking even a little bit , you should catch the movie Julie and Julia , its quite an inspiring and entertaining watch.

Now coming to these awesome pull-apart garlic rolls - the picture should speak for itself, so I am going to cut the story short and keep it simple :). These pull apart rolls are super soft pillow like bites which makes for a perfect weekend lunch/dinner. The garlic flavor comes through well, but I feel these rolls require a strong flavored soup or some kind of  spicy curry to use as a dipping sauce. If you want to have this with your evening chai or coffee, I would suggest you to customize the spread - probably make some veg/chicken curry stuffing for these rolls. But if you are one of them who likes to munch on some mildly flavored bread during your tea-time, these rolls by themselves works just fine. So off to the recipe.

Btw see the tomato basil soup in the white bowl , pretty no? :D

Garlic pull-apart rolls


Ingredients

Adapted from  mysingaporekitchen

Serves - 3  , makes 12 mini rolls
Prep time - 1 hr
Cook time - 30 min


For the dough

All purpose flour/Maida - 3 cups
Warm water - 1 cup plus little more
Yeast- 1tbps
Salt - 2 tsp
Sugar- 2 tbsp
Olive Oil- 2 tbsp

For final touch up on the rolls

Sesame seeds - as per need
Milk - few Tbsp

For the Garlic spread

Salted Butter - 50 gm [should be in soft-solid form]
Garlic cloves - 8-10 finely minced
Coriander leaves - a handful chopped well


How do you do it

Mix all the ingredients for the dough with warm water except oil into a smooth and soft ball. Knead for at least 10 minutes, the dough should spring back when you touch it. Once done add 2 tbsp of olive oil and knead once more. Keep it in a bowl covered with foil/cling film  for 45 minutes after which you should see the quantity of dough doubled. The first pic is the doubled quantity. I decided to take step wise pics only after the dough doubled , and hence the original quantity is not shown. I needed one cup of  warm water plus few more tbsp to make a slightly sticky dough, adjust water quantity accordingly , must be around 1 cup +/- few tbsp of water

Meanwhile prepare the garlic spread by mixing butter, minced garlic and chopped coriander together into a smooth spreadable texture as shown in the picture.

Also prepare a baking tray [ I used a tart pan to get a flower kind of shape] for baking these rolls. You could use any loaf tin or round cake tin too.Pre-heat oven for 10 minutes at 180 deg C.

Now to prepare to rolls - Punch down the air from the dough and divide the dough into 3 equal portions. Take one portion and using your rolling pin, roll into a rectangle of 1/2 inch thickness.[Apply flour to prevent sticking of the dough]

Take a tbsp of garlic spread and apply evenly all over the rectangle.Now roll the spread dough along its length [see in pic]. Cut into 4 equal parts. Repeat the same for the remaining two portions, you should have 12 rolls now. Let the rolls stand with the cut side facing up. Apply a tsp of garlic spread on top of the rolls too. Brush all sides of the roll with milk. Spread few sesame seeds on the sides and top of each roll. Place on prepared baking pan.

Let these rest for 20 more min for proofing. When you place the rolls in the baking tray, place them close to each other so that they touch each other.

Bake for 20-25 minutes at 180 deg C until done perfectly. Grill for 3-4 minutes at 180 deg C until you get the browning effect on top and sides of the rolls. Once done, cool if for 5-10 minutes and serve warm, fresh out of the oven with some soup or curry of your choice. For the shining effect, I applied some olive oil on the rolls once they were out of the oven.

We had this for lunch with  tomato basil soup and it was a super hit at home :) .


Print this Post

Continue Reading >>

Tuesday, August 14, 2012

Tomato Basil Soup

Soups are comfort food for many of us and nothing can beat that. A rainy season, a cold evening , a day spent on bed feeling sick  - that's exactly when a cup of piping hot soup does not fail to soothe you. Even if it weren't for all these different moods, I love taking in a huge bowl of yummy soup along with my favorite flavored bread for a very healthy and filling dinner.

Aromas cafe in Mumbai is one of my favorite places not for the coffee they serve but for their wide variety of entree and soups. Every time I step in there, I have to order their tomato basil soup and chicken satay ,otherwise they would feel left out. ;) .So I have been wanting to replicate that tomato basil soup for quite sometime. Last weekend was when I got around to it and made the soup along with garlic pull apart rolls for lunch and thoroughly enjoyed them :)

Oh and I almost forgot to mention the argument me and S had before clicking this picture. I don't have a very photogenic soup bowl in my collection yet and we had to really explore crockery options for this. I was strictly for using a white bowl which would really enhance the bright orange color of the soup , but S was quite sure this huge coffee mug would be attractive too. And the verdict? - I don't think this crockery did justice to the soup , and look at that basil tree sitting inside the coffee mug , not my idea people! :). I got my way eventually , we have a click saved with the same soup in a white bowl , but I am saving that pic for when I show you the awesome recipe for garlic pull apart bread.So we shall take a poll then to see whose side you are on OK? ;)

Tomato Basil Soup


Ingredients

Adapted from Sanjeev Kapoors Tomato soup

Serves - 2 [large servings]
Prep Time - 5 min
Cook time - 20 min


Tomatoes - 8 quartered
Basil Leaves - 3-4 + 2 [chopped thinly]
Onion - 1 medium sized , sliced thinly
Carrot - 1 medium length , sliced thinly
Garlic cloves - 4 chopped well
Bay leaf - 1
Pepper corns - 6
Oil - 1/2 Tsp
Butter - 1 Tbsp
Sugar - 1/2 Tsp
Crushed pepper corns - for seasoning
Salt - for  seasoning
Water - 3 cups

How do you do it

Heat a pan with the oil and butter. Once butter melts add bay leaf.After a few seconds add the onions , pepper corns and saute till the onions are translucent [it should not brown]. Add in the garlic cloves and carrot slices and saute for 2-3 more minutes. Add the tomato pieces , basil leaves and saute for a couple of more minutes. Add in 3 cups of water and bring to boil. Cover with lid and let it cook in medium flame for 10-15 minutes. Once done drain the water and reserve it. Discard the peppercorns and bay-leaf. Allow the rest to cool. Once cooled, blend the mixture along with some reserved water into a smooth puree.Pass this through a sieve and press the puree well to get all the liquid from it.

Bring this soup liquid to a boil again and add in the reserved water to adjust consistency of soup.Add 1/2 tsp sugar and chopped basil leaves and stir well. Season with required salt and crushed pepper.

Serve with your favorite starter/choice of bread. :)
 

 Notes

To make it creamy, you can add in 1/4 cup cream or 1/2 cup milk and let it thicken on low flame

If you have added too much reserved water  by mistake, you can mix few tbsp of corn-flour with water and add it to the soup and boil it on low flame until it thickens

You can skip the basil if you don't have them and just follow the same recipe to make tomato soup.
 

Print this Post

Continue Reading >>

Saturday, August 11, 2012

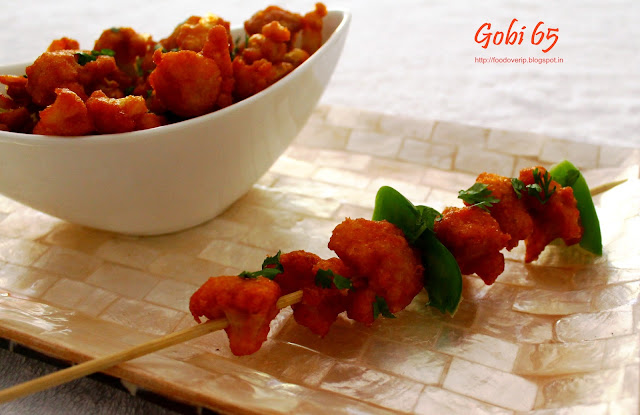
Gobi 65 - Restaurant Style

The first thing this Gobi 65 reminds me of are how me and my cousins were not allowed to eat this in my paati's place when they made this. :(. Usually Gobi 65 is made on Sundays as a special vegetarian item for my Grandad/uncle who did not eat non-vegetarian dishes. So the rule in the house was that , those who were non-vegetarians are not allowed to eat Gobi 65 as it was reserved for the vegetarians. Hmmp! ;)

How many of you have wondered where this tag "65" came from for various dishes such as chicken, Gobi, paneer etc. I have - many a times but never looked it up until now.  There are many different stories for how the name came about. Below are the two interesting ones from wiki :)

Chicken 65 is alleged to be a dish introduced in 1965 at the famous Buhari Hotel restaurant in Chennai by its founder A.M.Buhari, a pioneer in the South Indian food industry. They also offer Chicken 78, Chicken 82 and Chicken 90, introduced in 1978, 1982 and 1990 respectively.

Another storyline is that northern Indian army soldiers frequented a military canteen in Chennai. Its menus were written in Tamil, the local language. As most soldiers could not read Tamil, they made their choice by citing the number of the dish on the menu. The dish's popularity spread among the soldiers by word of mouth. They'd simply ask for "number 65"; soon, the dish became known officially as "Chicken 65".

Gobi 65


Ingredients

Serves - 3
Prep Time - 20 min
Resting time - 30 min
Cook time - 15 min


Cauliflower - 1 medium sized
Maida/All purpose flour - 1/2 cup
Corn flour - 3 Tbsp
Red Chilli/Curry powder - 1-2 Tbsp [adjust according to spice level]
Ginger Garlic [GG] paste - 1 Tsp
Salt - as per need
Water - 1/4 cup to make the marinade [ adjust accordingly]
Red food color - a pinch [optional]
Turmeric - 1/2 tsp + a pinch
Oil - for deep frying [1/2 cup]

Lemon - 1/2 [ to squeeze juice on top before serving]

How do you do it

Separate the cauliflower florets , and slice into medium sized pieces. We first need to clean the cauliflower. Boil few cups of water [2-3] . Add a tsp of salt and 1/2 Tsp turmeric to the boiling water. Now throw in the cauliflower pieces mix well,and let it boil for 2-3 minutes on high flame. Switch off flame. Stir the cauliflower pieces well and drain completely. By now your cauliflower pieces must be half cooked. It should be firm to bite. Use tissue paper and pat the pieces to remove excess water from the cauliflower. Keep aside and let it dry.

Mix the maida, corn flour,chilli powder, GG paste , salt , a pinch of turmeric , red food color in a bowl and form a thick paste of this with water. The consistency of this is important, it should be as thick as your toothpaste. I used 1/4 cup of water, but adjust accordingly when you make the paste. Taste the marinade to check for salt-spice level and make changes as needed. Add the cauliflower pieces to this marinade and wrap well, so all the pieces are coated well. This needs to rest for a minimum of 30 minutes.

Heat oil [medium heat] in a kadai for frying the cauliflower pieces. Drop a little marinade to check if the oil is heated properly, if it rises above immediately, you are ready to go. Drop 8-10 pieces of cauliflower into the oil, deep fry until it turns into a nice red color. Remove from oil and drain on tissue paper. Repeat the same and fry them in batches.

While serving you could squeeze lemon on top of these pieces. Needless to say it makes an absolutely delicious starter :).

Notes

The cauliflower pieces needs to be firm to bite and only half cooked. Do not overcook them.

It is important to drain the water completely from the cauliflower and gently pat with tissue paper to remove excess water without damaging the florets.But don't try to remove too much , little water content of the gobi will help to easily wrap the Gobi in the marinade. Standard rule for deep frying is that water content has to be very low

The consistency of the marinade needs to be thick, as thick as your toothpaste.

When frying,I dropped the cauliflower piece by piece, instead of dropping a handful of pieces together. They tend to stick together in the oil and trying to break them up while frying or later seemed difficult.

If you do not want to deep fry it, you could take a baking tray lined with foil, apply some oil on it, spread Gobi on the foil, drizzle few drops over the Gobi and the grill it in the oven for about 20 minutes for 200 deg C, turning the Gobi over after10 min to grill evenly


Print this Post

Continue Reading >>

Wednesday, August 8, 2012

Mushroom Fried Rice

I have taken a big liking to variety rice recently. I love the fact that they are one pot meals that get ready in minutes and makes for a good and quick to pack lunch. So I experiment with different kinds of flavor for variety rice quite often.One such trail was this simple mushroom fried rice which turned out to be quite delicious. Nothing fancy about the method/ingredients used but once again a reminder that simple food/flavors tastes so awesome.

Mushroom Fried Rice


Ingredients

Serves - 2
Spice Level - Moderately Spicy
Prep Time - 15 min
Cook time - 15 min


Basmati Rice - 1 cup
Oil - 2 Tbsp
Cinnamon - 1 inch piece
Bay leaf - 1
Cloves - 2
Jeera - 1 tsp
Onion - 2 medium ,chopped finely
Ginger Garlic [GG] paste - 1 Tsp
Green chilli - 2 , slit length wise
Button Mushroom - 200 gm pack, cleaned and chopped into medium sized pieces
Garam Masala - 1/2 Tsp
Curry powder - 1/2 tsp
Turmeric - a pinch [optional]
Salt - as per need
Pepper powder - 1/2 Tsp [optional]
Coriander Leaves - handful, washed and chopped

How do you do it

Cook the rice in 1.5 cups of water with 2 Tsp salt for 12-15 minutes and immediately transfer to a plate. Spread the rice on the plate, and drizzle a few drops of oil and stir it lightly and cool it. The rice should not be mushy, cook it like you would do for biryanis.

Next, heat 2 Tbsp oil in  a kadai, add bay leaf, cinnamon and cloves , jeera and let it roast for a few seconds. Add the chopped onion and GG paste. Saute till onions are translucent. Add in the green chilli now and give it a stir and saute for a couple of more minutes. Add in the chopped mushrooms now and saute till they give a shiny look - should take 3-5 minutes. Add in the turmeric [if using] , garam masala ,curry powder  and  salt now and saute till the raw smell of the powder vanishes.Now lower the flame, add in the cooked rice and toss it gently to wrap well with the mushroom mix in the kadai. Also add in the coriander leaves now and wrap well until the rice is completely mixed well with the mushroom mix taking care not to mash up the rice.Check for seasoning , add more salt and pepper [optional] if you like to.

Serve with raita and chips.

Note

1.You can skip the turmeric if you want the rice to take on a brownish shade. Turmeric lends the yellow color to the rice. I intended not to use it , but out of habit added a pinch and it resulted in the yellow color of the rice. :)

2. We have already added salt while cooking the rice, so be cautious while adding salt later.


Print this Post

Continue Reading >>

Saturday, August 4, 2012

Palak Paneer

You know how people feel this compulsion to bake every once in a while , Off-late I have been feeling the same with paneer :) . I think its got do with the fresh paneer sold here, and whenever i lay my eyes on them, i want to push a block of paneer into my shopping bag ;).  I did that last week and what it turned into was Palak Paneer.

I have been quite hesitant about ordering palak paneer in restaurants or making them at home, I always imagined that the dish would be quite bland and not so flavorful. The vibrant green color of the dish would tempt me but I keep away :) . Not too sure why but I have these very weird mental blocks when it comes to trying certain kinds of food - so here I am reminding myself that I need to be more food-adventurous ;).

The first time I tasted Palak Paneer was at my cousins place a few years back, I wasn't blown away with the flavor, but atleast it moved me away from my previous opinion. Since then I have made palak paneer a couple of times using the usual recipe of blending palak with tomato-onion but in my head it wasn't a lip-smacking dish. I saw a very interesting variation on a TV show and tried it the very next day. I was very happy with the taste and this recipe is a keeper for me. S loved it and ended up finishing most of the dish too! :D

Palak Paneer


Ingredients

Recipe Source- Suvayo Suvai TV show
 
Serves - 4
Spice level - moderate
Prep time - 30 mins
Cooking time - 10 mins


Palak - 1 bunch  [ 250-300 gm ]
Panner - 200 gm  [ cut into square medium sized pieces]
Onion - 1 Finely chopped
Garam Masala -  1 Tsp
Curry/Chilli/Masala powder - 1 Tsp
1/2 Tsp Sugar
Salt- as per need
Oil - 1 Tbsp + 1 Tbsp

To grind to a paste

Coriander leaves - 2 handful
Green chilli - 3
Garlic - 8 small cloves , or 4-5 big cloves
Jeera - 1 tsp
Ginger - 1 inch piece
Cashwes - 10
Water- 4-5 Tbsp to grind with

Method

1. Firstly make a smooth paste of items given under "To grind to a paste" and keep aside.

2. Pick and wash the leaves of the palak , remove the stems completely. Boil a cup of water, add in the palak leaves along with 1/2 Tsp sugar and cook until the leaves are tender - this should take 3-5 minutes. Once done, removes the leaves alone and transfer to a different bowl. It needs to be removed from the hot water to retain color, and adding 1/2 tsp sugar in the above step is also for the same reason. Reserve the water used to cook the palak in, don't throw it away. Once the palak has cooled down a little, blend the palak to form a puree, add some reserved water if needed and keep aside. Add a tsp of salt to this puree.

3. Heat a pan, add a tbsp of oil. Arrange the cubed paneer pieces on the pan and let it roast until it starts to brown, flip the paneer cubes to slightly brown the other side too. Transfer the pieces to a tissue paper, and pat it with another tissue paper to remove the oil. Now put these paneer pieces in about a cup of lukewarm water for 15 minutes [This is done to keep the paneer pieces soft yet firm] . Drain again and remove water with tissue paper and keep aside. We saute the paneer pieces to firm them up and make sure they dont get squashed when finally added into the curry. [This step is optional, you may add in fresh paneer if you like it that way].

4. Heat a tbspn of oil in pan, add chopped onions and saute well until translucent. Add in the ground paste done in step 1 and saute well. The raw smell should entirely vanish - this will take some time 7-10 minutes. Since there are cashews in the paste, it tends to stick to the pan, so take care of this and keep stirring. Once this paste is cooked well, add in palak puree, garam masala, curry powder remaining salt , mix well and bring to boil on low flame. If the curry is too thick, add some reserved water from step 2 to loosen it. Now add in the paneer pieces ,simmer flame and let it boil for few more minutes.Remove from flame.

Serve with pulkas , it will be super yum! :)


Print this Post

Continue Reading >>

Thursday, August 2, 2012

Mango Lemonade

One thing I really look forward to during the summer season is the mangoes. And this time, we had that in plenty, almost every other night after dinner, eating mangoes became a routine. I wanted to make some dessert but never got to it :|. I saw this refreshing mango lemonade recipe recently and was tempted to make it before the season got over. I have made this twice now in a span of two weeks time, it was that good :).

Mango Lemonade


Ingredients

Adapted from Red chillies

Serves - 3

Mango pulp - 1/2 cup
Sugar - 1/4 cup
Water - 1/2 cup
Lemon - 1 Large  - remove the juice of this.

Cold water - as per need
Ice cubes - as per need

How do you do it

First step is to make the sugar syrup. Boil 1/2 cup water in a pan, add the sugar into it, and on low flame, keep stirring until sugar dissolves. Switch off flame and cool this syrup completely. Next make the mango pulp by blending the mango pieces without any water. Once the sugar syrup is cooled, add it to the mango pulp along with the lemon juice and blend once again completely. So your mango lemonade concentrate/mix is ready.

Now use this concentrate with chilled water to make the mango lemonade drink. The ratio of the concentrate and chilled water varies as per need. I got about 3-4 glasses of mango lemonade.The concentrate stays good for about 2 days when refrigerated.

I also added extra lemon juice from another half of a lemon, wanted the lemon to dominate more. 

While serving add ice cubes and maybe add some mint leaves if you like it. :)


Print this Post

Continue Reading >>

Wednesday, August 1, 2012

Dosai/Dosa Batter recipe | How to make dosai

Anybody out there who doesn't like dosai? Please knock here - I am yet to meet somebody who doesn't like it! ;). Its a favorite among many and is quite popular among the non-Indian crowd as well. :). In my home, this is a staple like idlis and I always grind dosai batter separately. A lot of folks use idli batter to make dosai as well, but I feel when you do that you end up with soft dosai that are not so crispy. Also dosai batter making is quite easy and most of us can do it well unlike the idli batter. Go ahead and give it a try :) . Lets get started!

Dosai | Dosai Batter


Ingredients

Idli Rice - 2 cups
Raw Rice - 2 cups
Urad dal - 3/4 cup
Salt - 8 tsp
Water - as per need

** I get really good quality urad dal here and hence 3/4 cup is enough for me. Normally I would recommend you to start with 1 cup urad dal. **

How do you do it

The ratio of rice and dal mentioned here is not a standard. You can tweak it according to your need. The concept here is that - urad dal gives softness and color to the  dosai and raw rice make the dosai crispy. So start with the above proportions of idli rice, raw rice and dal, if you find your dosa too crispy,increase the dal quantity or decrease the raw rice quantity. If you want the dosai to be more crispy, increase raw rice quantity or decrease the urad dal quantity. So play around with the proportions to suit your need. For me the above ratio works well.

Wash idli rice ,raw rice and urad dal and soak all of them together in water for about 4-5 hours.Water level needs to be well above the rice and dal. Do not wash the urad dal thoroughly, just wash it once. Washing it quite well would remove the yeast content and hence deter the fermentation process.

Add all the soaked rice and dal along with the water used to soak them in into your wet grinder/mixie  and grind them for 30-40 minutes to get a smooth textured batter. Add water in between to make sure your grinder moves smoothly. You need to use a ladle and scrape the sides of the grinder vessel, and along the hinges of the grinder stone where the dal/rice might get stuck. Do this 2-3 times. I used 2-3 cups of water while grinding for the above proportions. The final consistency of the batter has to be a little thinner than dosai batter as the batter will thicken after fermentation. You can see the consistency of the batter in the picture as well. Just before you finish grinding, add salt into the vessel and let the grinder spin for a minute or two. Transfer this into a vessel now. We are done, that simple :). No mixing with hand etc are needed for this like idli batter. The next step is to ferment this batter.

Note: Water quantity to be used while grinding, mentioned above is approximate. It depends on various things such quality of rice, dal and the amount of water you use to soak the rice, dal etc. So use your judgement to vary the amount to get the right texture.

Fermentation Process

The best part about dosai batter is that even if it doesn't ferment well, your dosai will be okay/good unlike idli batter where if its not fermented well, idlis will turn out hard.

Now we need to ferment this batter for about 8-10 hours. I have a really huge vessel and I ferment the entire mix at one go. You need to have a vessel where the batter occupies only 60% of the space, as after fermentation the batter will rise above ~ 25-30%. So use two vessels if needed. What my Amma does is that, she keeps half the batter inside the fridge immediately and ferments the rest. You could do that too and later ferment the other half when needed.

For fermentation, the optimum temperature is 30-32 deg C. If the temperature is below 30 deg C, it may take more than 10 hours to ferment, and if the temperature is > 32 deg C, and the batter stays out for > 8 hours, it will become sour. For me,it takes about 12 hours to ferment, after which i move the containers to the refrigerator. If you are staying a cold place, the following should work.

1. Preheat oven for a few minutes and place the vessel inside the oven, close the oven door.
2. Turn on the oven light, keep the batter vessel inside and leave it closed.
3. If you don't have an oven, take warm water in a huge vessel and place the batter vessel inside the vessel containing warm water and leave it.

So once the batter has risen, move it to the fridge. This should stay good for about 10 days , its lasted me that much.

Note: I have used a steel vessel and as well as a tupperware box for the batter to ferment in, and both has worked well. But in any case, do not close the vessel with air-tight lid.

How to make Dosai


When you take the dosai batter out of the fridge to make dosai, check for salt and batter consistency. If the batter is thick, add water and  bring it to dosai batter consistency and add more salt if required.

Heat a dosai pan. Once the pan is moderately hot, take a ladle full of dosai batter, and spread it in the form of concentric circles like in the picture. Wait for a few seconds and then drizzle a few drops of oil on top of the dosai. Cover the pan with a lid if you don't intend to flip the dosai and cook the other side too and that's what I do. Once the bottom browns and becomes crispy, remove it.

Serve hot with tomato chutney or chettinadu sambar! :)

Notes: 

If you have only idli batter and want to make dosai , you can mix rice-flour with water and add to idli batter, this will also give a crispy texture. I have tried both these methods but grinding dosai batter separately obviously works much better.

You can use this batter to make kuzhi-paniyaram and Appam too.

Print this Post

Continue Reading >>
Related Posts Plugin for WordPress, Blogger...

A la carte!

Along with idli/dosai (13) Along with rice (32) Along with rotis (21) asparagus (1) baby potatoes (4) bajji (1) baking (9) banana (1) basil (1) basmati (2) beans (1) beetroot (5) bhindi (3) biryani (1) Black eyed beans (2) blueberry (1) bok choy (1) bottle gourd (1) bread (3) breakfast (4) brinjal (4) brocolli (1) buttermilk (1) butternut-squash (1) cabbage (2) cakes (7) carrot (1) carrots (3) cashews (1) cauliflower (8) cheescake (2) chettinadu (24) chettinadu delicacy (23) Chicken (7) chilli (1) Chineese (3) chinese (1) chocolate (1) chole (2) chutney (6) coconut (5) coconut milk (1) coriander (4) corn (1) cow-peas (1) cream-cheese (2) curry leaves (1) dal (3) dates (1) desserts (14) diwali 2013 (1) dosai (1) drink (1) drumstick (2) dry field bean (1) Easy (44) egg (3) fenugreek (1) fish (1) Food and Travel review (1) garlic (9) ginger (1) gobi (1) green gram (1) How To (5) Indian Flat Breads (4) indian sweets (3) International (5) ivy gourd (2) jeera (3) kootu (1) kovakkai (1) lemon (3) lentils (11) lobia (1) malai (1) mango (2) masoor dal (1) Methi (2) mint (2) mix veg (9) mochai (1) moong dal (4) mushroom (10) mutton (1) non-veg (2) onion (2) orange (1) paneer (11) parathas (1) pasta (2) peas (7) pepper (1) pickles (1) plantain (1) poriyal (1) potato (14) potatoes (2) quinoa (1) Rajma (1) rasam (1) rice flour (1) rosemary (2) shallots (1) snack (18) soup (7) soy chunks (1) spinach (6) stir-fry (1) strawberry (1) sweet potatoes (1) tamarind (5) tomato (7) toor dal (1) val bean (1) Variety Rice (13) walnut (1) wheat (2) yoghurt (1) yuuum!! (1) zucchini (2)

Latest on Food Over IP

Copyrights

All rights reserved @2012.

Unless otherwise mentioned, the text and images included in FoodOverIP blog belongs to the author. The blog author’s permission is required before any content is reproduced in any form.

  © Blogger templates The Professional Template by Ourblogtemplates.com 2008

Back to TOP  

Blogging tips